A Developer's Guide to nuvo's dataHandler
The dataHandler feature has been deprecated since version v3.3.0. We recommend using the more sophisticated stepHandler instead.
For help with migration:
- Use our Migration GPT for automated guidance
- Contact our support team at [email protected]
dataHandler
In this guide, you’ll learn how to use nuvo’s dataHandler, a powerful tool for solving complex data problems such as transposing data, merging and splitting columns, joining sheets, de-nesting data, and more.
Benefits of dataHandler
nuvo’s dataHandler provides the flexibility and power required to import data, making it easier for businesses to handle complex data onboarding by eliminating manual work and improving data quality.
It achieves this using the headerStep and reviewStep functions. Both give you full access to the whole data set. headerStep gives you access to the file's meta data and reviewStep gives you access to logs that contain applied mappings, added columns and options.
Here are some key benefits of using nuvo’s dataHandler:
- Data Manipulation: nuvo’s
dataHandlerenables you to perform simple to complex data tasks, such as transforming a single column or an entire dataset, joining multiple sheets, summarizing columns, and much more. - Enhanced Processing Speed and User Control: The
dataHandlerfunction gives you access to the whole data set, providing you with immediate control over the input data both post-upload and after the mapping step. - Customization: nuvo's
dataHandlerempowers you with the flexibility to extend existing functionality and incorporate logic tailored to their specific data edge cases.
Prerequisites
To follow along with this guide, you will need:
- Basic understanding of TypeScript and React
- A nuvo account (Sign-up for free here)
- A CodeSandbox account (Sign-up for free here)
Getting Started
To get started, add nuvo to your react project by running the following command:
npm install @getnuvo/importer-react
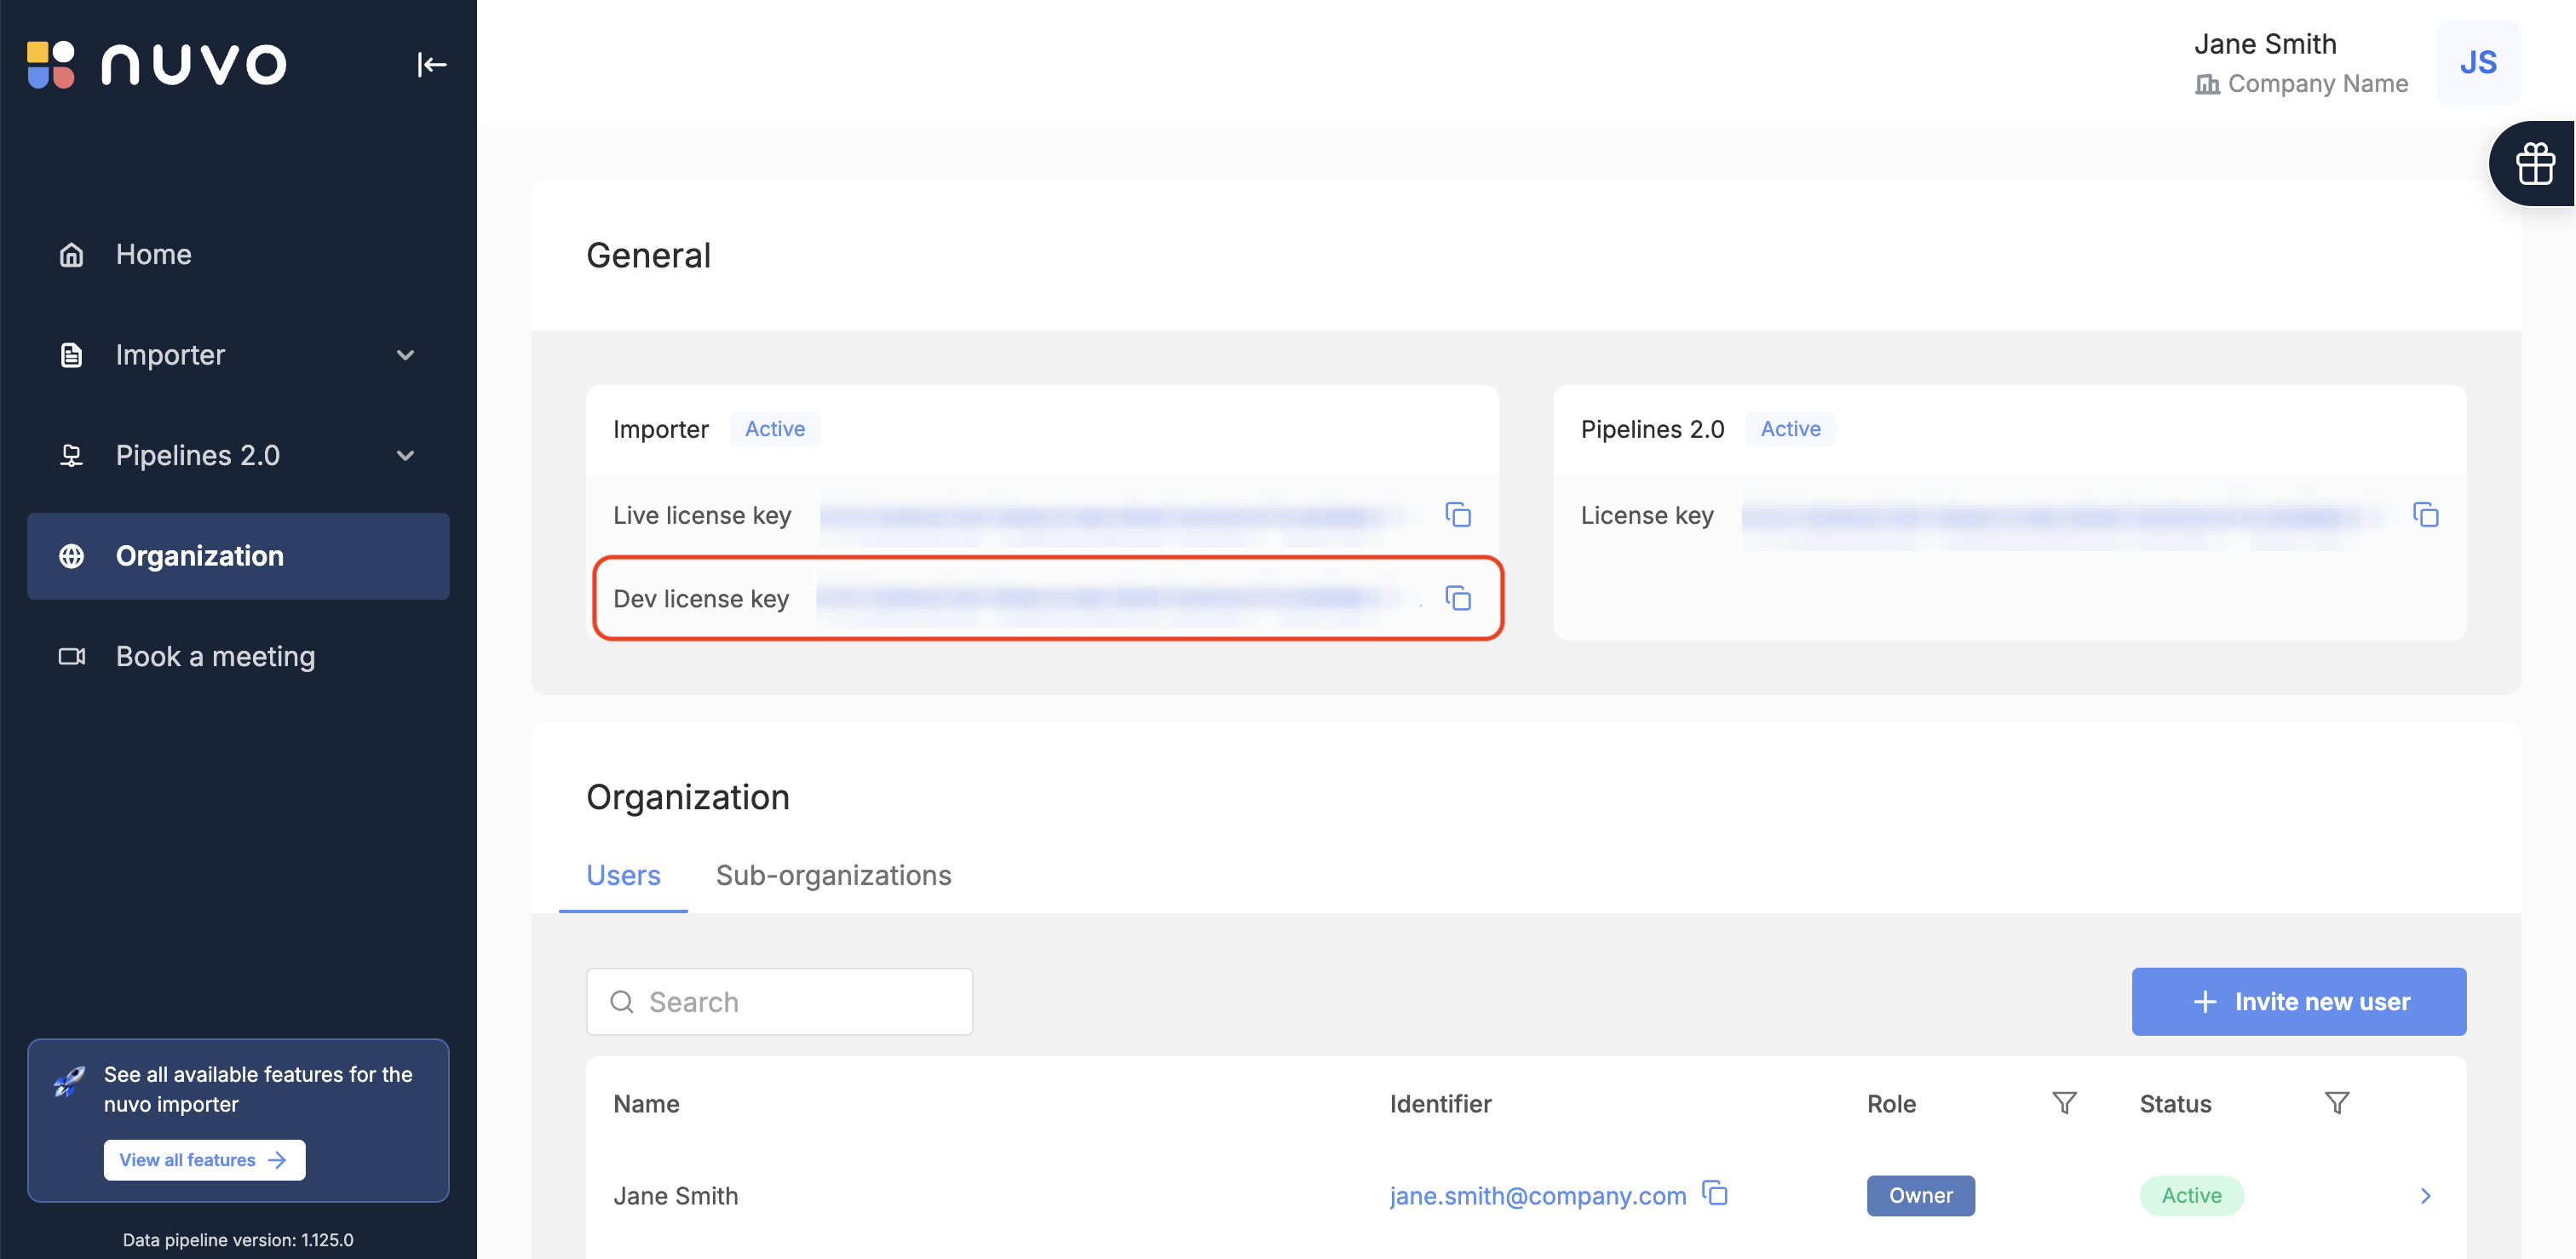
Next, log into your nuvo account and copy your license key from the dashboard.
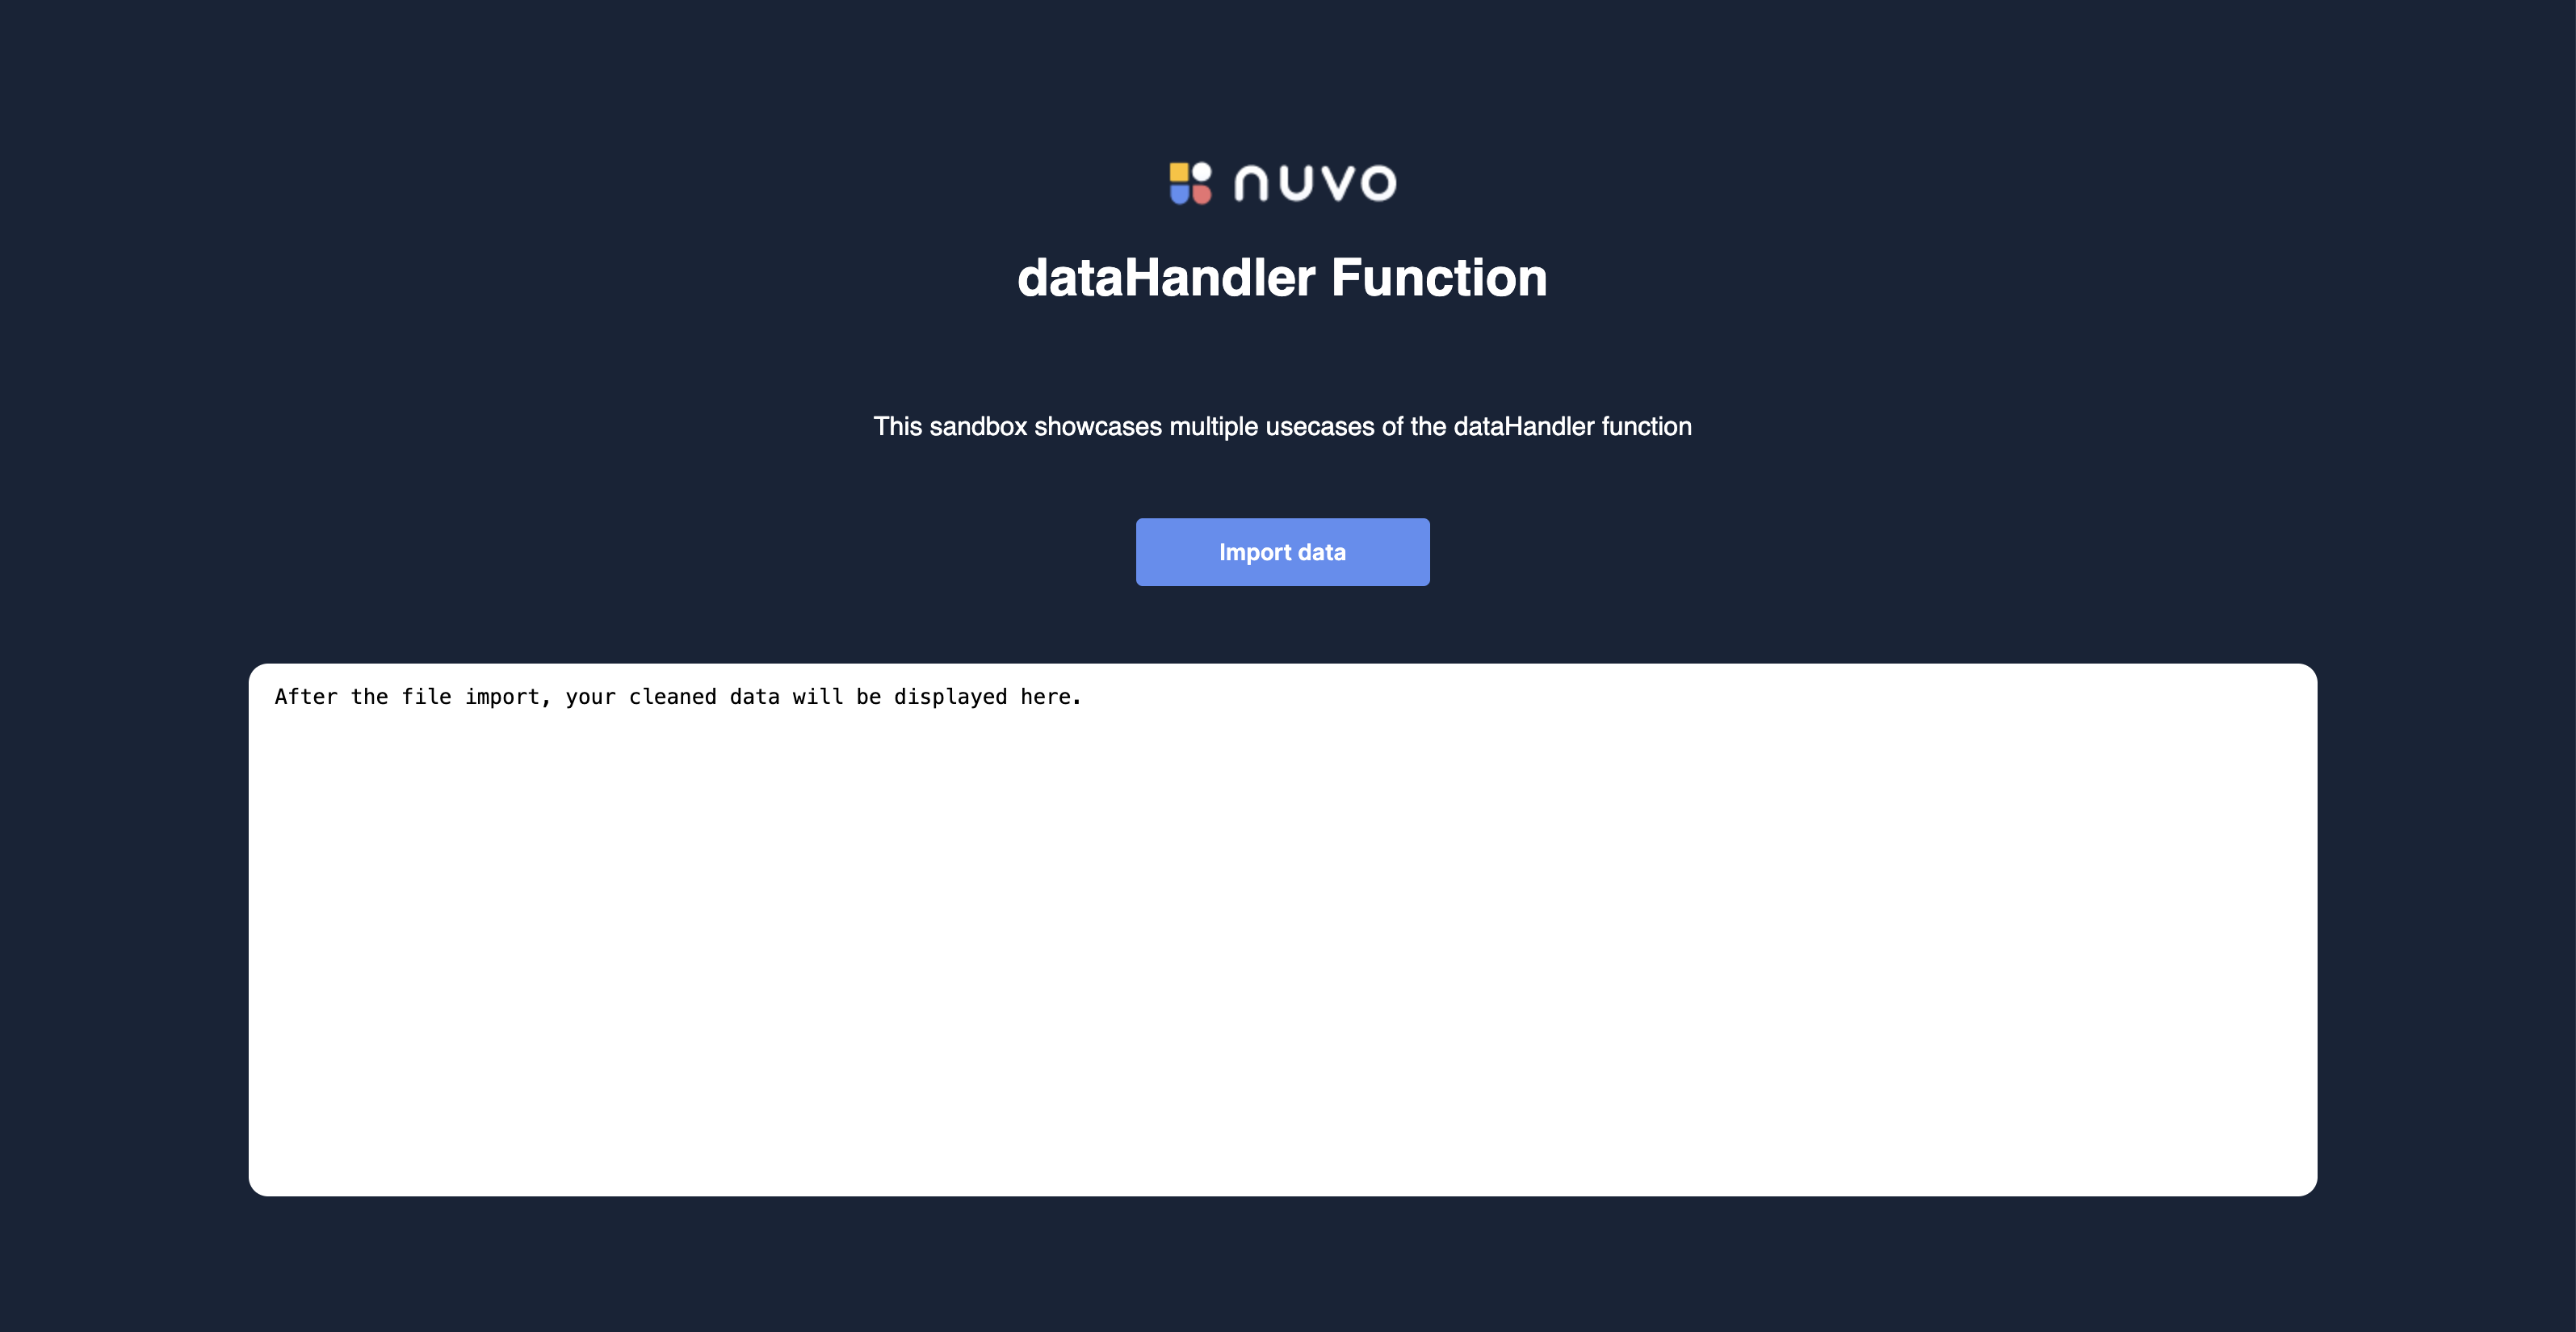
Additionally, if you don’t have an existing project, you can fork this CodeSandbox starter file. It already has the UI setup and the dependencies installed.
Sample Use Cases
Let's explore several use cases and how to implement them using nuvo’s dataHandler:
- Transpose Headers
- Merge Multiple Sheets
- De-nest List Values into Multiple Rows and Vice Versa
- Gather File Metadata
- Summarize Column Data
- Handle Address Import Complexities
- Customize Warnings in the Review Step
- Convert Comma-Separated Floats to Dot-Separated Floats
- Backend Data Validation
- Nesting Information Based on Common Value
- Remove Empty Cells from Output
Transpose Headers
A sample use case for transposing headers is when your customer provides data with the headers as a column instead of a row. You can use dataHandler to transpose the data into the format required by your system.
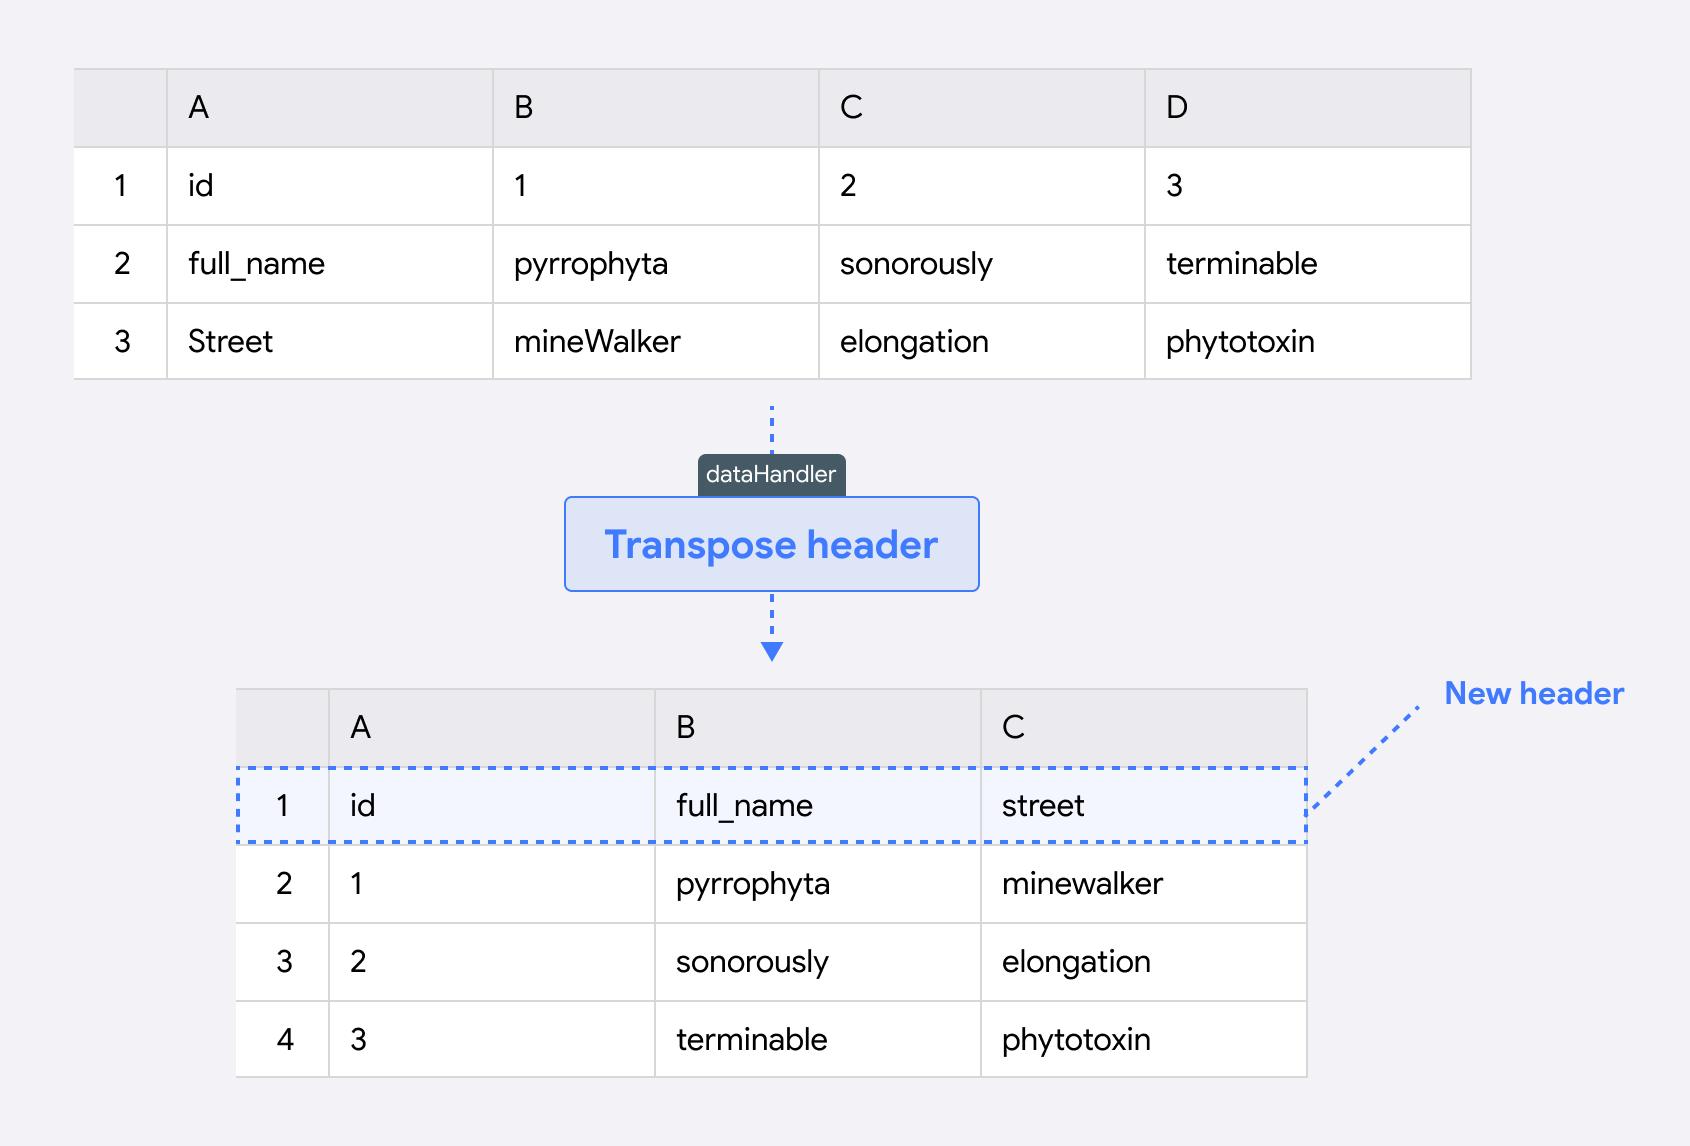
To do this, use the following code snippet:
dataHandler={{
  headerStep: async (_modifier: any, data: any) => {
    // Get the number of rows and columns
    const rows = data[0].data.length;
    const cols = data[0].data[0].length;

    // Initialize a new array with the transposed dimensions
    const transposedArray = new Array<Array<any>>(cols);

    // Loop over each column
    for (let i = 0; i < cols; i++) {
      // Initialize a new row for each column
      transposedArray[i] = new Array<any>(rows);

      // Loop over each row and copy the value from the original array
      for (let j = 0; j < rows; j++) {
        transposedArray[i][j] = data[0].data[j][i];
      }
    }

    return transposedArray;
  },
}}
Here is a quick breakdown of this headerStep function:
-
The function first determines the dimensions of the data by calculating the number of rows and columns in
data[0].data(where the sheet data is stored). These dimensions guide the transposition process. -
A new array,
transposedArray, is initialized with a length equal to the number of columns (cols). This will store the transposed data, swapping rows with columns. -
The function iterates over each column in the original data. For each column, it initializes a new row in
transposedArraywith a length equal to the number of original rows. This setup ensures that the transposed structure is ready to receive values. -
Inside the column loop, another loop goes through each row. The function takes each value from the original
dataand places it into the correct position intransposedArray, effectively swapping the original row and column positions. -
After all values are transferred, the function returns the
transposedArray, which now contains the data with rows and columns swapped.
This headerStep function reorganizes the data structure by transposing rows into columns and vice versa, adapting it to match the expected target data model in the following step of the process.
Lastly, add this dataHandler hook to the NuvoImporter component:
<NuvoImporter
  licenseKey={"YOUR_LICENSE_KEY_HERE"}
  settings={{
    developerMode: true,
    identifier: "product_data",
    allowManualInput: true,
    columns: [
      {
        label: "Product ID",
        key: "product_id",
      },
      {
        label: "Article Name",
        key: "article_name",
      },
    ],
  }}
  dataHandler={{
    headerStep: async (_modifier: any, data: any) => {
      // Get the number of rows and columns
      const rows = data[0].data.length;
      const cols = data[0].data[0].length;

      // Initialize a new array with the transposed dimensions
      const transposedArray = new Array<Array<any>>(cols);

      // Loop over each column
      for (let i = 0; i < cols; i++) {
        // Initialize a new row for each column
        transposedArray[i] = new Array<any>(rows);

        // Loop over each row and copy the value from the original array
        for (let j = 0; j < rows; j++) {
          transposedArray[i][j] = data[0].data[j][i];
        }
      }

      return transposedArray;
    },
  }}
  onResults={(result: any, errors: any, complete: () => void) => {
    console.log("Errors: ", errors);
    setResult(result);
    complete();
  }}
/>
Check out the complete code in this CodeSandbox. You can test the application using the data available for download within this sandbox.
Merge Multiple Sheets
A sample use case for merging multiple sheets is when your user has a dataset with multiple sheets to organize data. In such situations, you can utilize the dataHandler to offer them the flexibility of merging sheets based on a unique column.
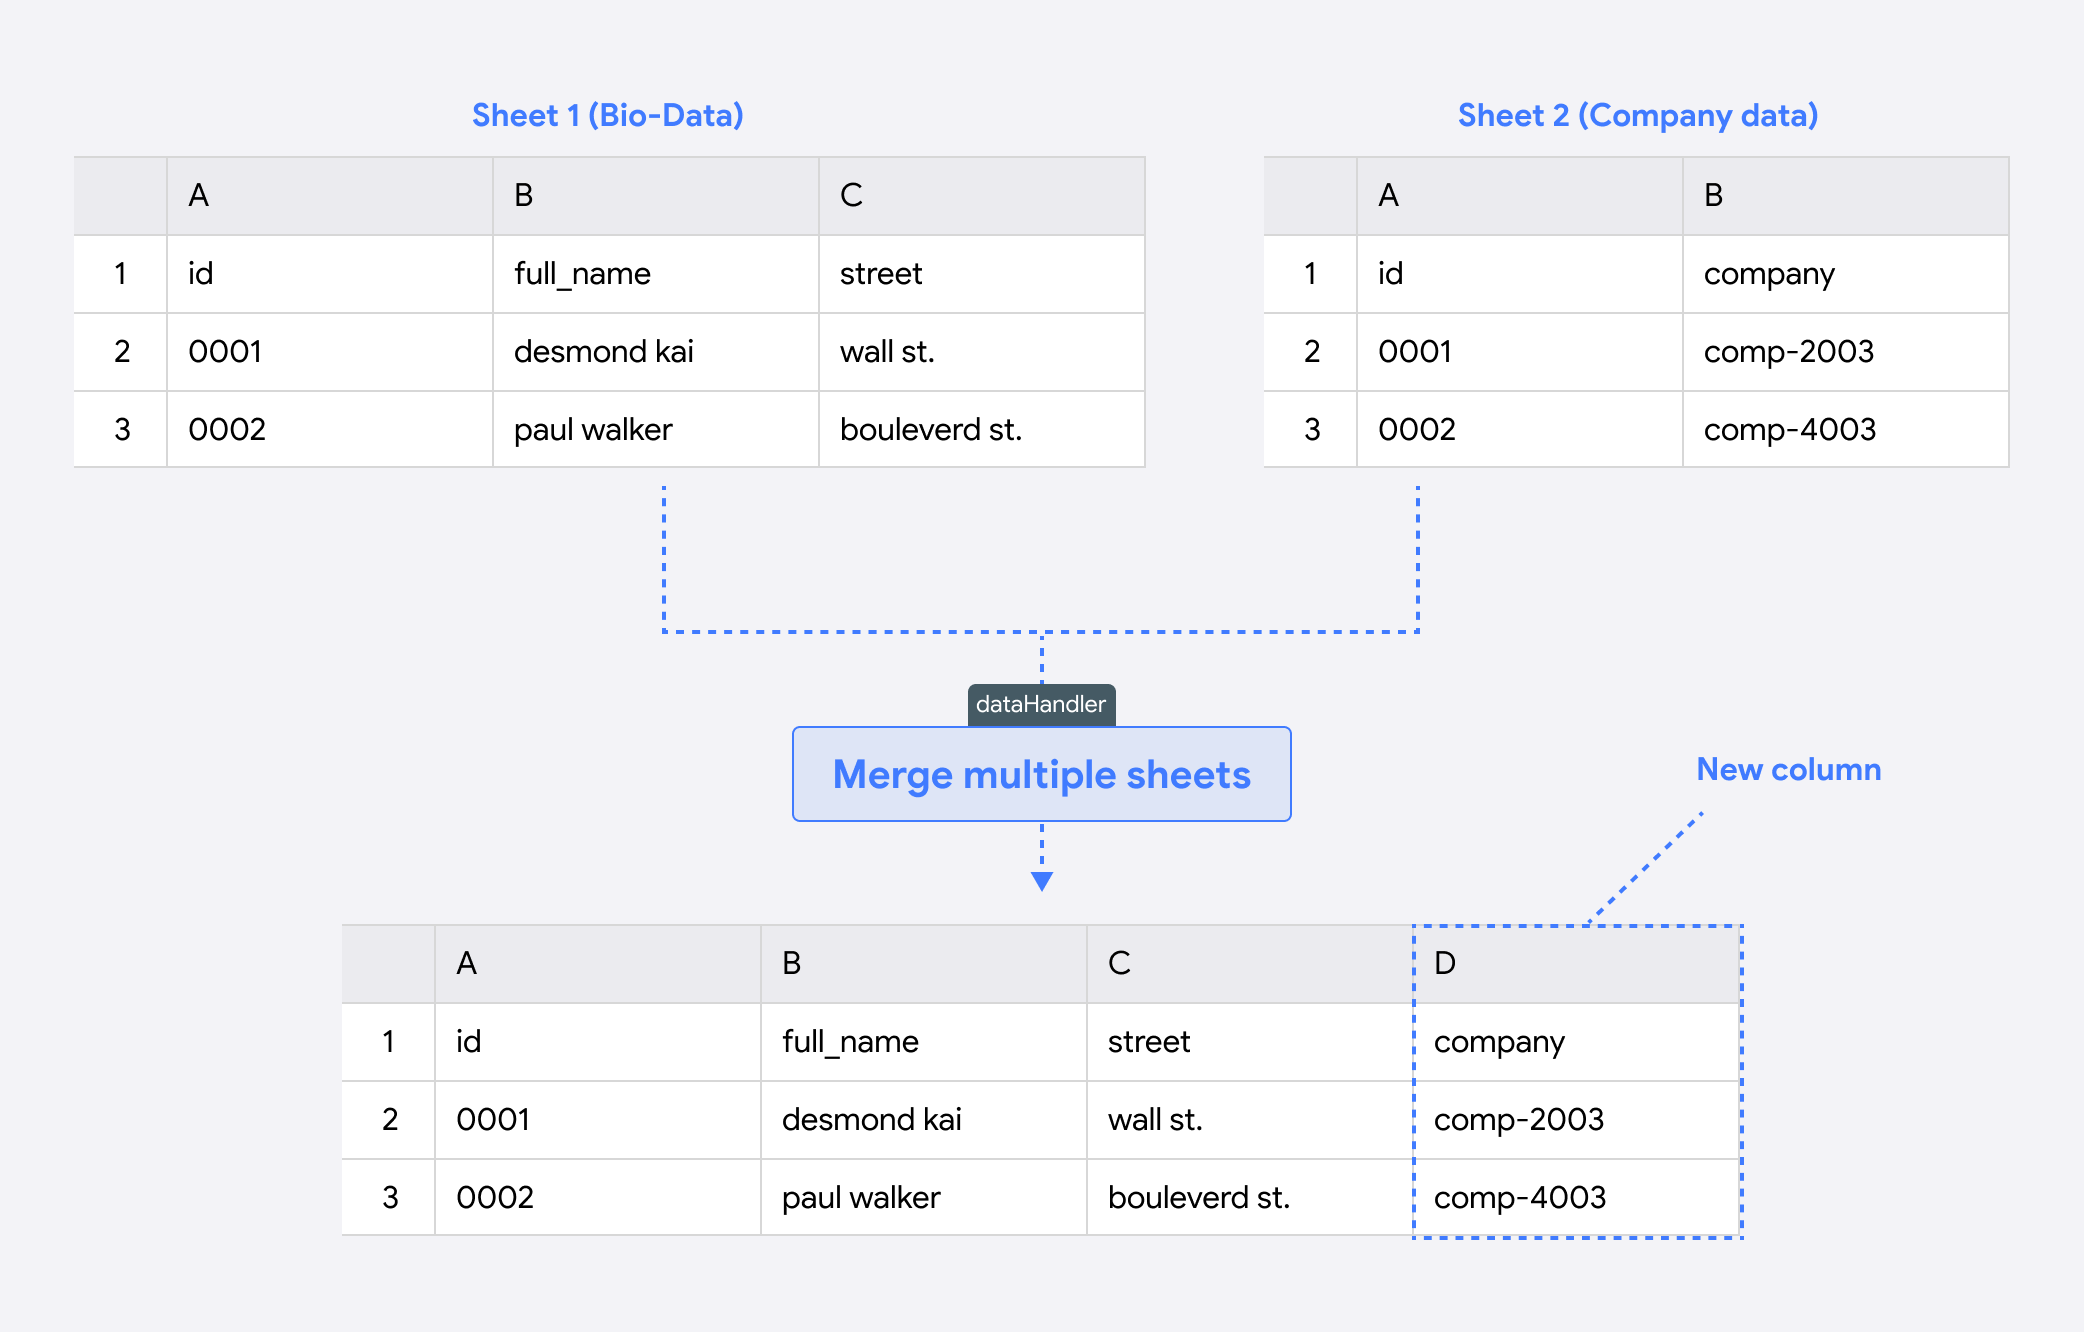
To do this, use the following code snippet:
dataHandler={{
  headerStep: async (_modifier, data) => {
    const sheet1 = data[0].data;
    const sheet2 = data[1].data;

    // Find the index of the "id" column in both arrays
    const idIndex1 = sheet1[0].indexOf("id");
    const idIndex2 = sheet2[0].indexOf("id");

    // Initialize the merged array with the headers from both sheets
    const mergedArray = [
      [
        ...sheet1[0],
        ...sheet2[0].filter((header) => header !== "id"),
      ],
    ];

    // Loop over each row in sheet1, starting from the second row
    for (let i = 1; i < sheet1.length; i++) {
      const id1 = sheet1[i][idIndex1];

      // Find the corresponding row in sheet2 using the id column
      const row2 = sheet2.find((row) => row[idIndex2] === id1);

      // Combine the rows from both sheets into a single merged row
      const mergedRow = [
        ...sheet1[i],
        ...(row2
          ? row2.slice(1)
          : new Array(sheet2[0].length - 1).fill(null)),
      ];

      // Add the merged row to the merged array
      mergedArray.push(mergedRow);
    }

    return mergedArray;
  },
}}
Here is a quick breakdown of this headerStep function:
-
The function starts by defining
sheet1andsheet2based on the data provided. Notice that data contains an array of sheets, so the first sheet can be accessed throughdata[0], the second sheet throughdata[1], and so on. -
It then identifies the index of the "id" column in both sheets, which will be used to align data rows between the two sheets.
-
Next, it initializes the
mergedArraywith headers from both sheets. It uses all headers fromsheet1and then adds the headers fromsheet2, except the "id" column (to avoid duplication). -
The function then loops through each row in
sheet1, starting from the second row to skip the headers. It fetches the "id" value from each row, which is used to find the matching row insheet2. -
For each row in
sheet1, the function searches for a corresponding row insheet2with the same "id" value. It then merges these rows, aligning data from both sheets into a single row. If no match is found, it fills the missing values fromsheet2withnullplaceholders. -
Finally, the function returns
mergedArray, which now contains the combined data from both sheets, structured in a way that aligns matching entries by "id".
This headerStep function merges two sheets by matching rows based on a shared "id" column, providing a unified data structure that combines both data sources.
A key part of this setup is enabling the component to handle multiple file uploads, which is central to this use case. To achieve this, set the multipleFileUpload option to true.
Lastly, add this dataHandler hook to the NuvoImporter component:
<NuvoImporter
  licenseKey={"YOUR_LICENSE_KEY_HERE"}
  settings={{
    developerMode: true,
    identifier: "product_data",
    allowManualInput: true,
    multipleFileUpload: true,
    columns: [
      {
        key: "id",
        label: "Organisation Id",
        columnType: "string",
      },
      {
        key: "name",
        label: "Name",
        columnType: "string",
      },
      {
        key: "company",
        label: "Company",
        columnType: "string",
      },
    ],
  }}
  dataHandler={{
    headerStep: async (_modifier, data) => {
      const sheet1 = data[0].data;
      const sheet2 = data[1].data;

      // Find the index of the "id" column in both arrays
      const idIndex1 = sheet1[0].indexOf("id");
      const idIndex2 = sheet2[0].indexOf("id");

      // Initialize the merged array with the headers from both sheets
      const mergedArray = [[...sheet1[0], ...sheet2[0].filter((header) => header !== "id")]];

      // Loop over each row in sheet1, starting from the second row
      for (let i = 1; i < sheet1.length; i++) {
        const id1 = sheet1[i][idIndex1];

        // Find the corresponding row in sheet2 using the id column
        const row2 = sheet2.find((row) => row[idIndex2] === id1);

        // Combine the rows from both sheets into a single merged row
        const mergedRow = [...sheet1[i], ...(row2 ? row2.slice(1) : new Array(sheet2[0].length - 1).fill(null))];

        // Add the merged row to the merged array
        mergedArray.push(mergedRow);
      }

      return mergedArray;
    },
  }}
  onResults={(res, errors, complete) => {
    setResult(res);
    complete();
  }}
/>
Check out the complete code in this CodeSandbox. You can test the application using the data available for download within this sandbox.
De-nest List Values into Multiple Rows and Vice Versa
A sample use case for de-nesting list values is when a customer puts multiple values in a single cell, and they need to separate these values into their respective cells.
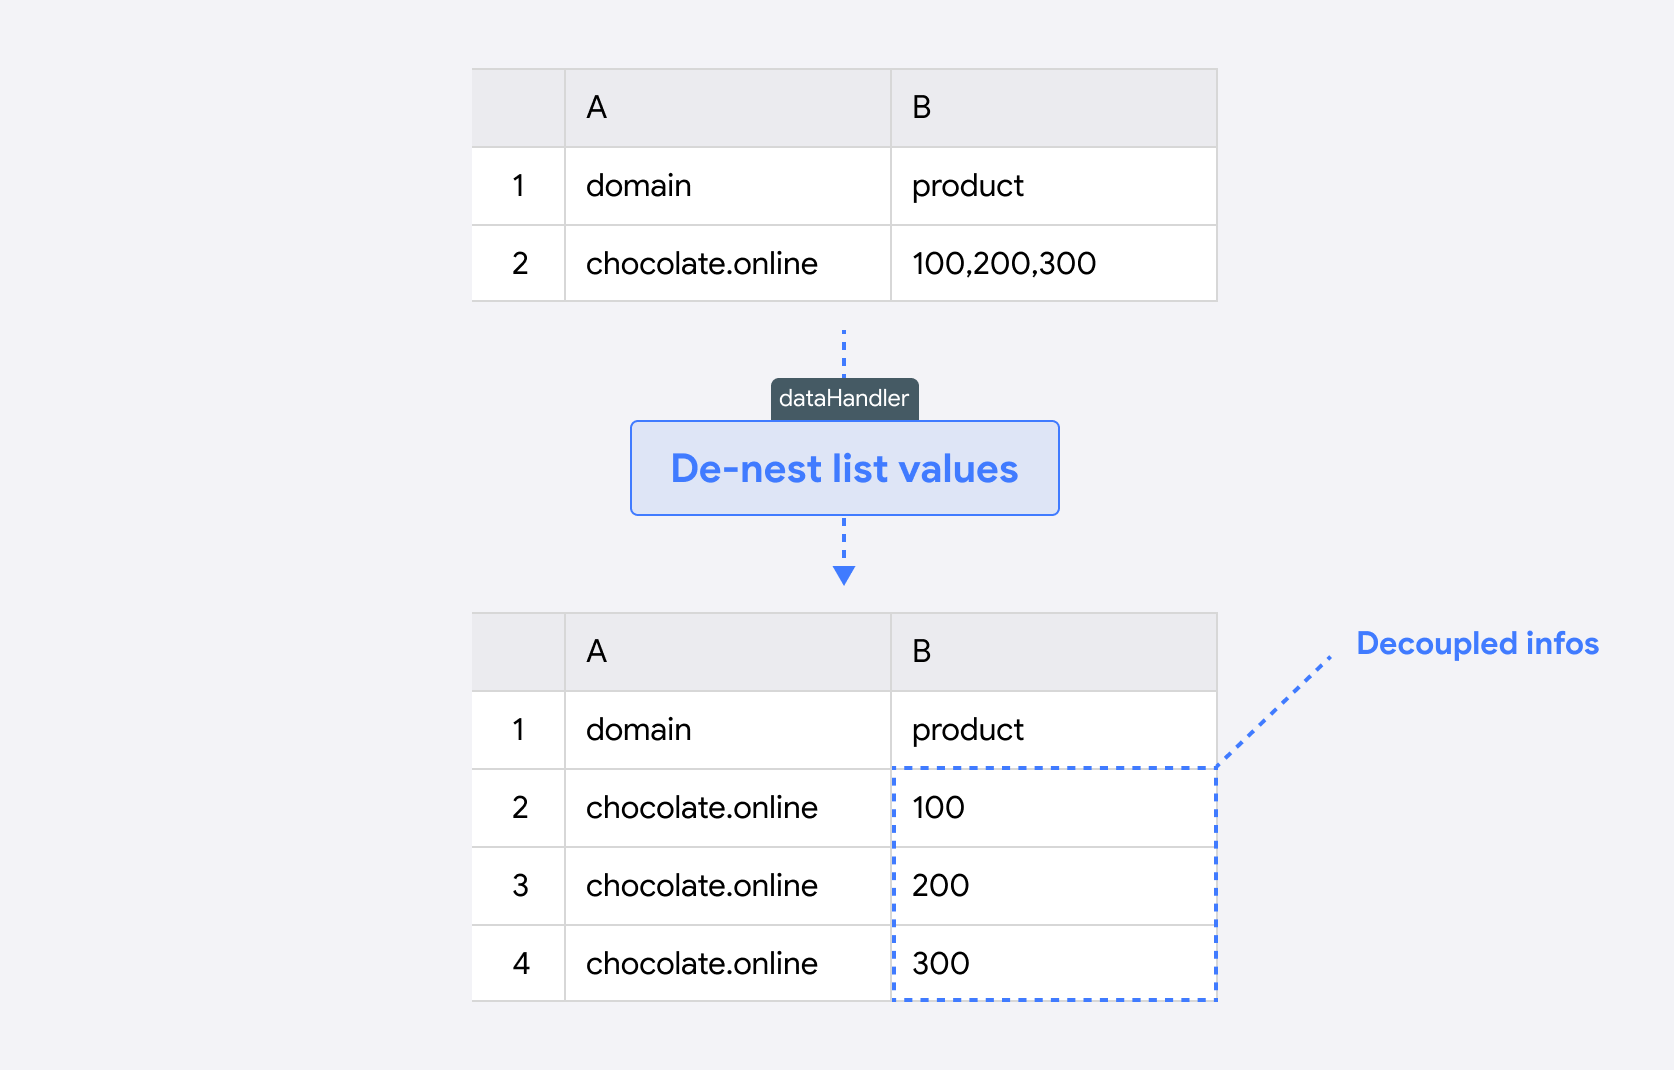
To do this, use the following code snippet:
dataHandler={{
  reviewStep: async (modifier: any, data: any) => {
    const splitterColumn = "product";
    const targetColumn = "domain";

    const splitter = (value: string) => {
      return value.split(",");
    };

    for (let i = 0; i < data.length; i++) {
      const element = data[i];
      const topic = element[targetColumn];
      const value = splitter(`${element[splitterColumn]}`);

      if (value.length > 1) {
        modifier.removeRow(i);
        modifier.addRow({
          data: value.map((entry) => ({
            product: entry,
            domain: topic,
          })),
        });
      }
    }
  },
}}
Here's a quick breakdown of this reviewStep function:
-
The function defines
splitterColumnandtargetColumnvariables to specify which columns will be split and where the corresponding values will be stored. It also includes asplitterfunction that separates values in thesplitterColumnusing a comma, turning them into an array of individual items. -
The function loops through each entry in the data. For each entry, it retrieves the
splitterColumnvalue, splits it into separate items, and stores the result in thevaluearray. It also extracts thetargetColumnvalue to ensure each new row retains this context. -
If the
splitterfunction returns more than one item, the function removes the original row withmodifier.removeRow(i). It then usesmodifier.addRow()to add new rows for each split item. Each row contains one of the split values from thesplitterColumnand the originaltargetColumnvalue. -
This approach allows the
reviewStepfunction to transform rows with multiple values in a single cell into multiple rows, each with distinct, separated values.
This de-nesting process is helpful for restructuring data where multiple values have been combined in a single cell and need to be individually separated for analysis or processing.
Lastly, add this dataHandler hook into the NuvoImporter component:
<NuvoImporter
  licenseKey={"YOUR_LICENSE_KEY_HERE"}
  settings={{
    developerMode: true,
    identifier: "product_data",
    allowManualInput: true,
    columns: [
      {
        key: "domain",
        label: "domain",
        columnType: "string",
      },
      {
        key: "product",
        label: "product",
        columnType: "string",
      },
    ],
  }}
  dataHandler={{
    reviewStep: async (modifier: any, data: any) => {
      const splitterColumn = "product";
      const targetColumn = "domain";

      const splitter = (value: string) => {
        return value.split(",");
      };

      for (let i = 0; i < data.length; i++) {
        const element = data[i];
        const topic = element[targetColumn];
        const value = splitter(`${element[splitterColumn]}`);

        if (value.length > 1) {
          modifier.removeRow(i);
          modifier.addRow({
            data: value.map((entry) => ({
              product: entry,
              domain: topic,
            })),
          });
        }
      }
    },
  }}
  onResults={(res: any, errors: any, complete: () => void) => {
    setResult(res);
    complete();
  }}
/>
Check out the complete code in this CodeSandbox. You can test the application using the data available for download within this sandbox.
Gather File Metadata
A sample use case for gathering file metadata is when customers need additional information about a dataset. Use the dataHandler to get the name, size, and type.
To do this, use the following code snippet:
dataHandler={{
  headerStep: async (_, metaData: any) => {
    setResult(metaData);
    console.log(metaData[0].data);
    console.log(metaData[0].fileSize);
    console.log(metaData[0].fileType);
    console.log(metaData[0].fileName);
    console.log(metaData[0].sheetName);
  },
}}
Here's a quick breakdown of the headerStep function for gathering the file's metadata:
-
The function accepts
metaDataas input, which contains various details about the dataset. -
It uses
setResult(metaData)to process or store the extracted metadata, making it available for further use. -
The function logs specific metadata details to the console, including:
metaData[0].data: The primary data from the file.metaData[0].fileSize: The size of the file in bytes.metaData[0].fileType: The type of the file (e.g., CSV, XLSX).metaData[0].fileName: The name of the file.metaData[0].sheetName: The name of the sheet (for multi-sheet files).
-
This setup enables the
headerStepfunction to quickly access and log important file metadata, which can be helpful for understanding the dataset’s context or for conditional processing based on file attributes.
This metadata-gathering process is useful when you need quick access to basic file information such as file size, type, and name for processing or auditing purposes.
Lastly, add this dataHandler hook into the NuvoImporter component:
<NuvoImporter
  licenseKey={"YOUR_LICENSE_KEY_HERE"}
  settings={{
    developerMode: true,
    identifier: "product_data",
    allowManualInput: true,
    columns: [
      {
        key: "cost",
        label: "cost",
        columnType: "int",
      },
      {
        key: "average",
        label: "average",
        columnType: "int",
      },
      {
        key: "height",
        label: "height",
        columnType: "int",
      },
    ],
  }}
  dataHandler={{
    headerStep: async (_, metaData: any) => {
      setResult(metaData);
      console.log(metaData[0].data);
      console.log(metaData[0].fileSize);
      console.log(metaData[0].fileType);
      console.log(metaData[0].fileName);
      console.log(metaData[0].sheetName);
    },
  }}
  onResults={(_result: any, _identifier: any, complete: () => void) => {
    complete();
  }}
/>
Check out the complete code in this CodeSandbox. You can test the application using the data available for download within this sandbox.
Summarize Column Data
A sample use case for summarizing column data is when customers need to sum up values in a dataset.
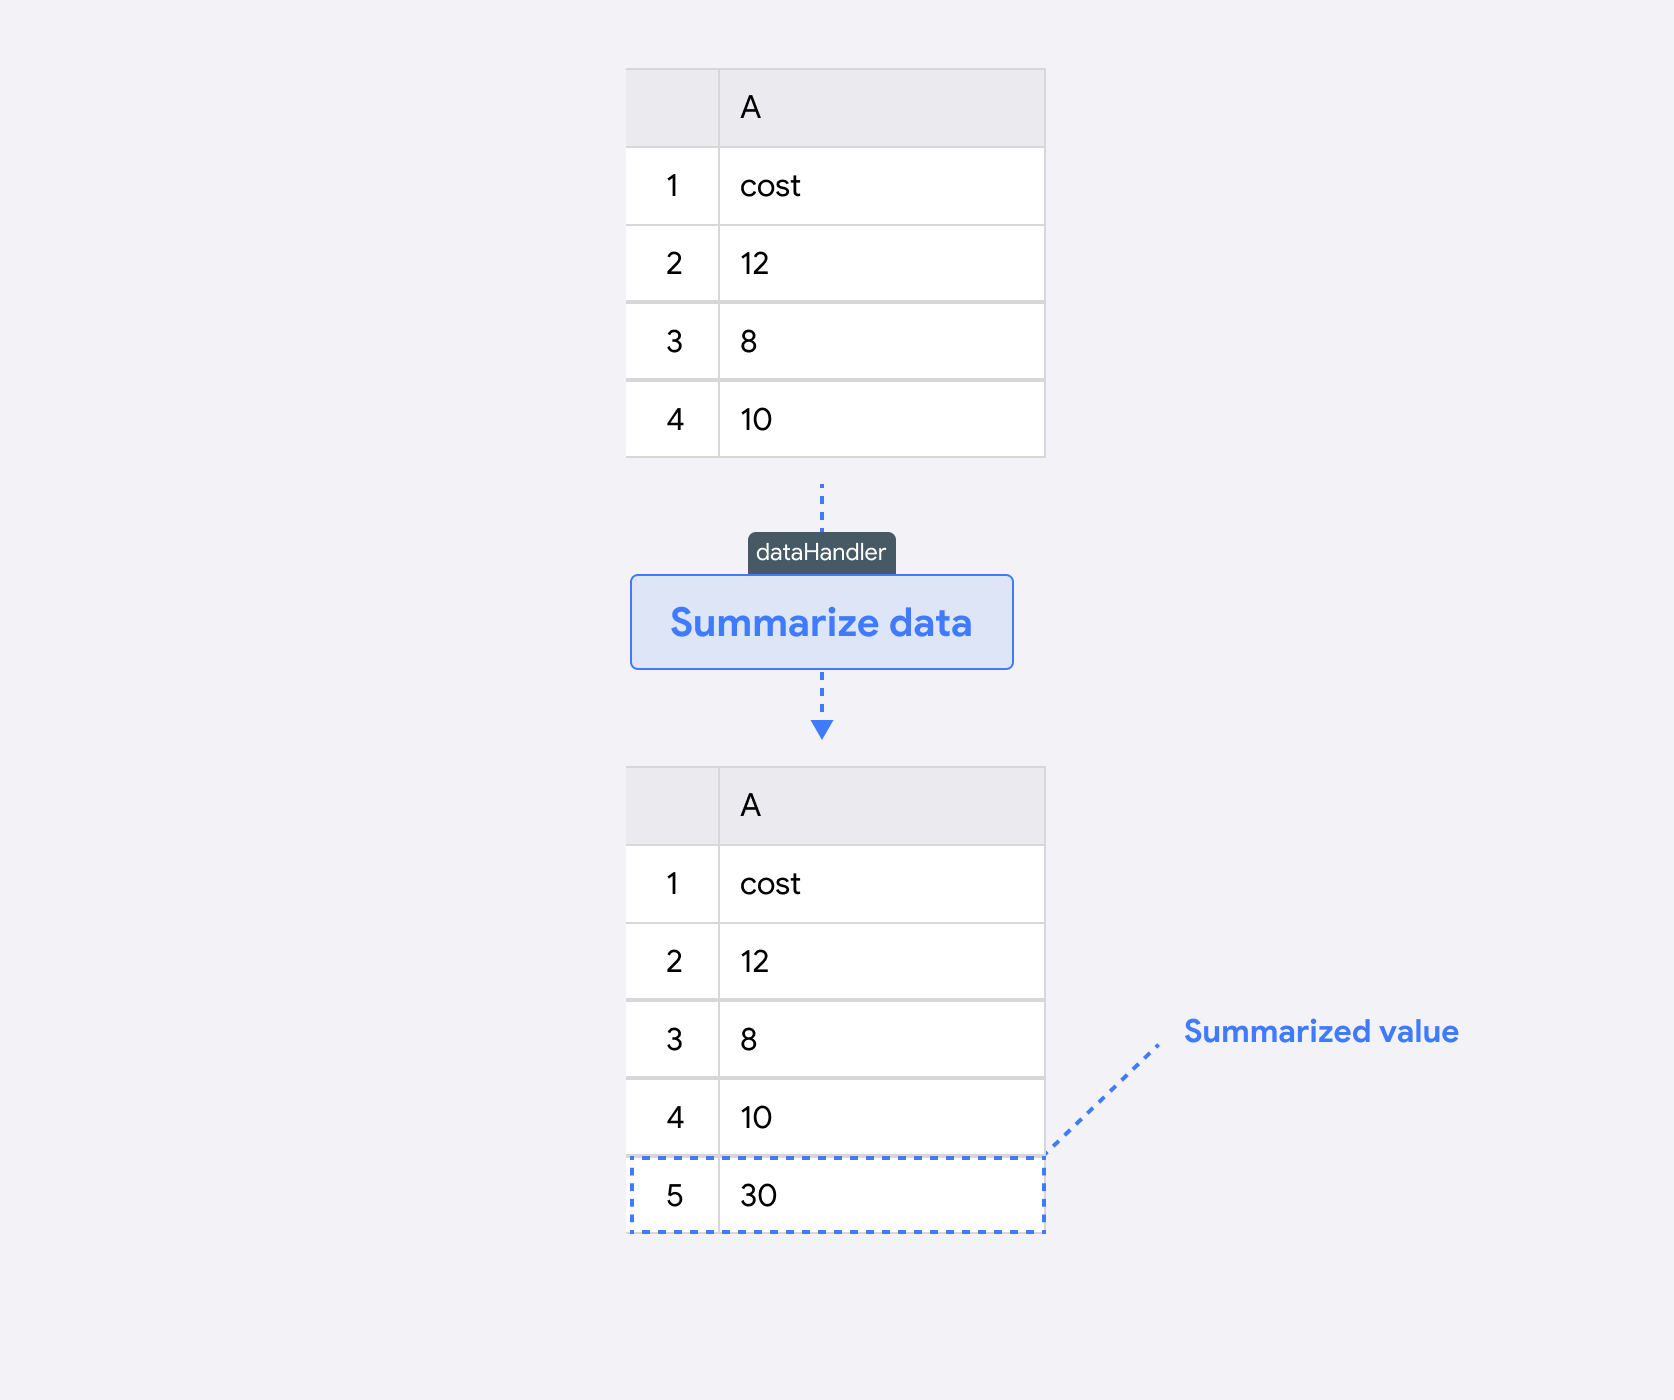
To do this, use the following code snippet:
dataHandler={{
  reviewStep: async (modifier: any, data: any) => {
    const sum: Record<
      string,
      {
        value: number;
        info: { level: string; message: string }[];
      }
    > = {};

    // Initialize sum object with the required structure
    for (const key in data[0]) {
      sum[key] = { value: 0, info: [] };
    }

    // Accumulate values and info messages
    for (let i = 0; i < data.length; i++) {
      for (const [key, value] of Object.entries(data[i])) {
        sum[key].value += Number(value) ?? 0;
      }
    }

    for (const [key, value] of Object.entries(sum)) {
      sum[key] = {
        value: sum[key].value,
        info: [
          {
            level: "info",
            message:
              "This field was auto-generated and displays the total of all column values.",
          },
        ],
      };
    }

    modifier.addRow({ data: [sum] });
  },
}}
Here's a quick breakdown of the reviewStep function for summarizing column data:
-
The function begins by creating a
sumobject, where each key corresponds to a column name, and each column is initialized with avalueof0and an emptyinfoarray. -
This structure will store the total value for each column and any relevant informational messages.
-
The function then loops through each row of
data. For each column in a row, it converts the value to a number (if possible) and adds it to the corresponding entry in thesumobject. -
This effectively accumulates totals for each column as the loop progresses through the dataset.
-
Once all values are summed, the function updates each entry in
sumwith an informational message. This message provides context, indicating that the field displays the total for that column. -
The message level is set to "info" to help users quickly identify this as summary data.
-
Finally, the function uses
modifier.addRow()to add a new row containing the summarized data to the dataset. This row includes the total for each column, along with a brief description.
This approach allows the reviewStep function to calculate and display column totals, making it useful for generating quick summaries of dataset values.
Lastly, add this dataHandler hook into the NuvoImporter component:
<NuvoImporter
  licenseKey={"YOUR_LICENSE_KEY_HERE"}
  settings={{
    developerMode: true,
    identifier: "product_data",
    allowManualInput: true,
    columns: [
      {
        key: "cost",
        label: "cost",
        columnType: "int",
      },
      {
        key: "average",
        label: "average",
        columnType: "int",
      },
      {
        key: "height",
        label: "height",
        columnType: "int",
      },
    ],
  }}
  dataHandler={{
    reviewStep: async (modifier: any, data: any) => {
      const sum: Record<
        string,
        {
          value: number;
          info: { level: string; message: string }[];
        }
      > = {};

      // Initialize sum object with the required structure
      for (const key in data[0]) {
        sum[key] = { value: 0, info: [] };
      }

      // Accumulate values and info messages
      for (let i = 0; i < data.length; i++) {
        for (const [key, value] of Object.entries(data[i])) {
          sum[key].value += Number(value) ?? 0;
        }
      }

      for (const [key, value] of Object.entries(sum)) {
        sum[key] = {
          value: sum[key].value,
          info: [
            {
              level: "info",
              message: "This field was auto-generated and displays the total of all column values.",
            },
          ],
        };
      }

      modifier.addRow({ data: [sum] });
    },
  }}
  onResults={(res: any, errors: any, complete: () => void) => {
    setResult(res);
    complete();
  }}
/>
Check out the complete code in this CodeSandbox. You can test the application using the data available for download within this sandbox.
Handle Address Import Complexities
A sample use case for handling address import complexities is when customers need to merge data from multiple columns into a single one. For example, merging columns containing street, city, and country to form a single address.
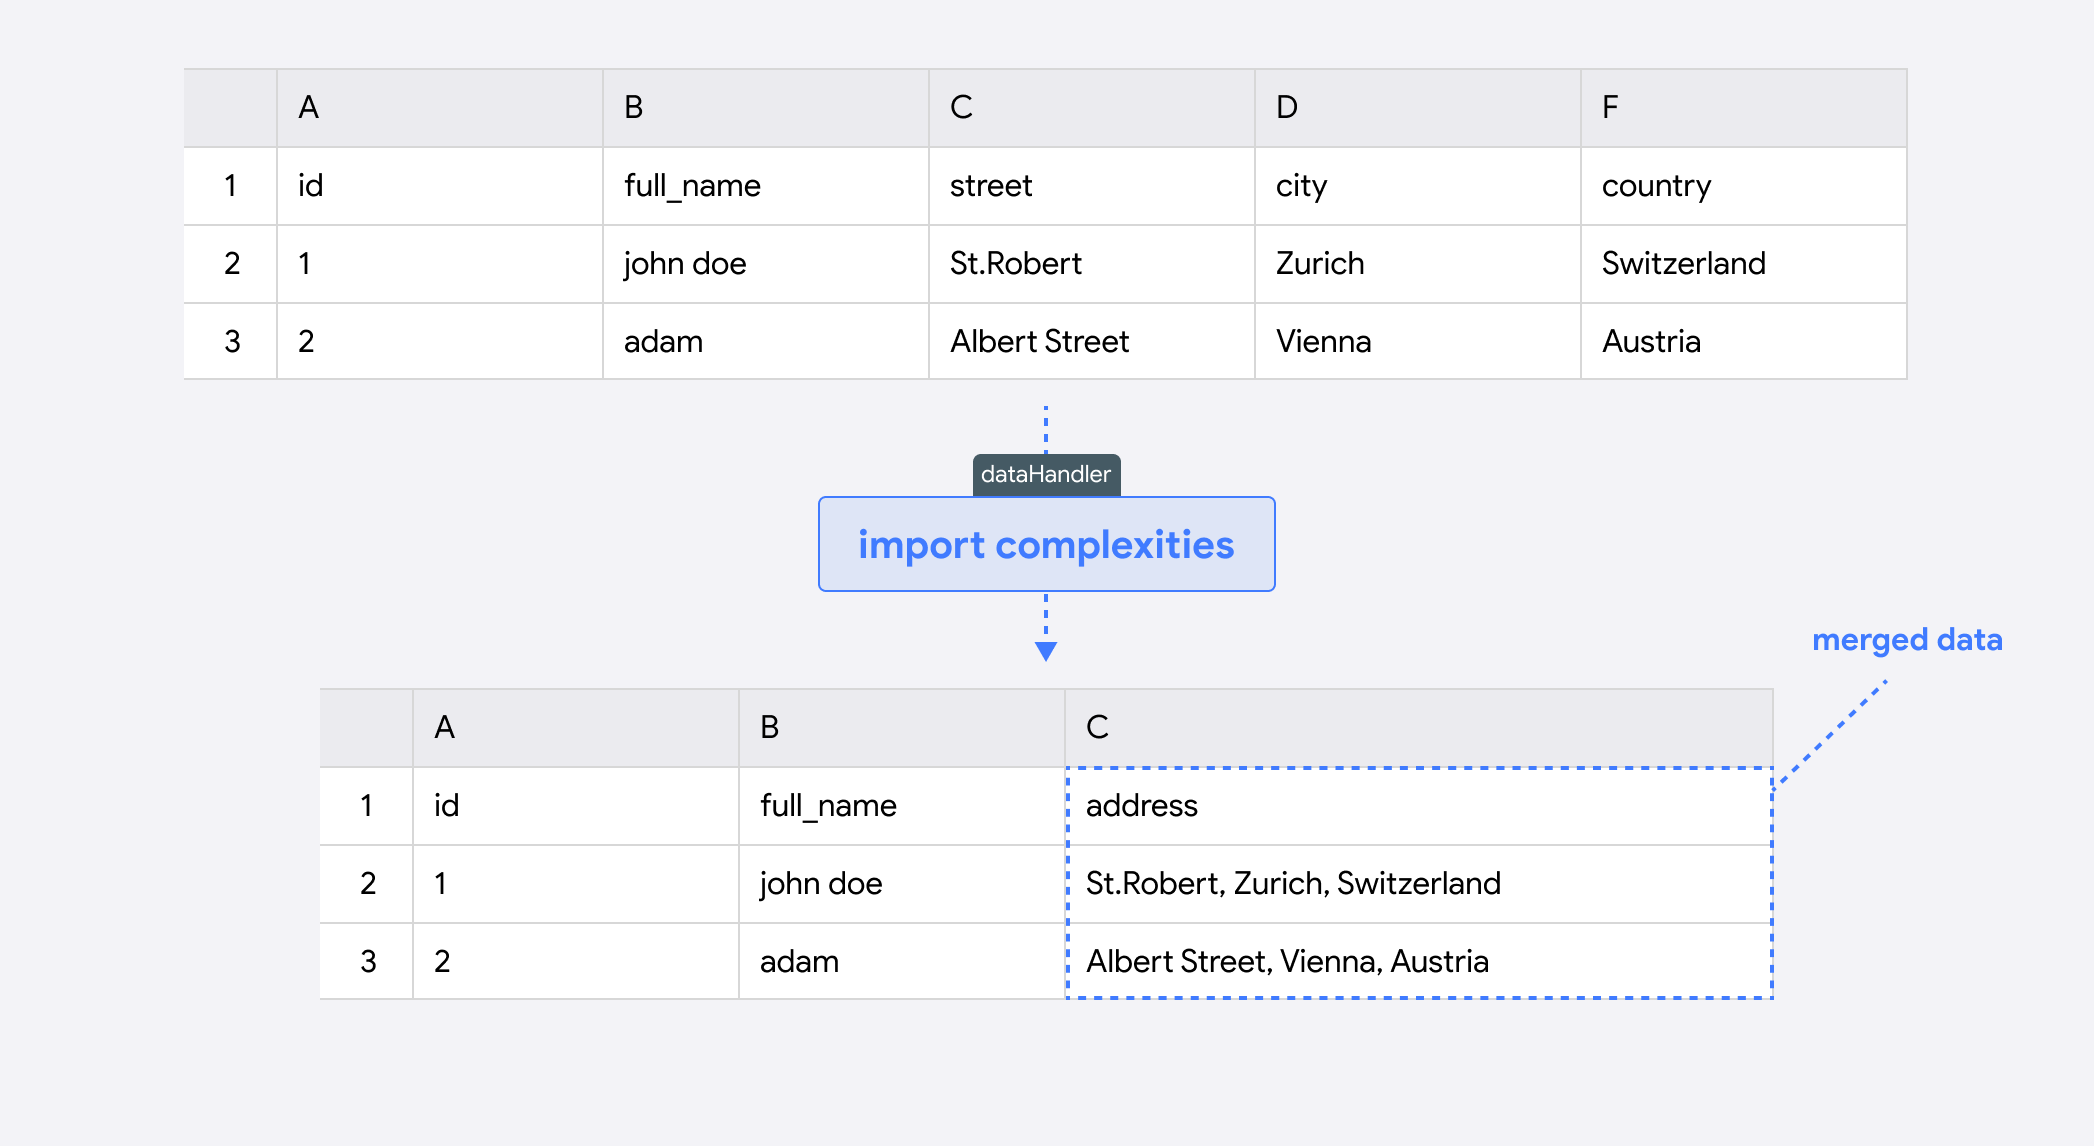
To do this, use the following code snippet:
dataHandler={{
  reviewStep: async (modifier, data) => {
    const dataLength = data.length;
    const newData: any = data;

    for (let i = 0; i < dataLength; i++) {
      const element = data[i];

      if (
        !element.address &&
        element.street &&
        element.city &&
        element.country
      ) {
        newData[i].address = {
          value: `${element.street}, ${element.city}, ${element.country}`,
          info: [
            {
              message: "This cell was automatically added.",
              level: "info",
            },
          ],
        };
      }
    }

    modifier.removeColumn("street");
    modifier.removeColumn("city");
    modifier.removeColumn("country");
    return newData;
  },
}}
Here's a quick breakdown of the reviewStep function for handling address import complexities:
-
The function starts by iterating through each entry in the
dataarray. It initializes anewDataarray to store modified entries, maintaining the original dataset's structure. -
For each entry, the function checks if an
addressfield is missing butstreet,city, andcountryfields are present. If these conditions are met, it concatenates thestreet,city, andcountryvalues into a single formatted string. -
This concatenated address string is assigned to a new
addressfield, which also includes an information object (within theinfoarray) with a custom message to indicate that it was automatically generated. -
Once all addresses are concatenated, the function removes the original
street,city, andcountrycolumns from the dataset usingmodifier.removeColumn(). This ensures the dataset only contains the newaddresscolumn, simplifying the structure. -
The function finally returns
newData, which contains the consolidated address data without the separatestreet,city, andcountryfields.
This method is useful for situations where address components need to be combined into a single field, providing a clean, consolidated view of the address information.
Lastly, add this dataHandler hook into the NuvoImporter component:
<NuvoImporter
  licenseKey={"YOUR_LICENSE_KEY_HERE"}
  settings={{
    developerMode: true,
    identifier: "address_data",
    columns: [
      {
        key: "full_name",
        label: "Full name",
        columnType: "string",
      },
      {
        key: "street",
        label: "Street",
        columnType: "string",
      },
      {
        key: "city",
        label: "City",
        columnType: "string",
      },
      {
        key: "country",
        label: "Country",
        columnType: "string",
      },
      {
        key: "address",
        label: "Address",
        columnType: "string",
      },
    ],
  }}
  dataHandler={{
    reviewStep: async (modifier, data) => {
      const dataLength = data.length;
      const newData: any = data;
      for (let i = 0; i < dataLength; i++) {
        const element = data[i];

        if (!element.address && element.street && element.city && element.country) {
          newData[i].address = {
            value: `${element.street}, ${element.city}, ${element.country}`,
            info: [
              {
                message: "This cell was automatically added.",
                level: "info",
              },
            ],
          };
        }
      }

      modifier.removeColumn("street");
      modifier.removeColumn("city");
      modifier.removeColumn("country");
      return newData;
    },
  }}
  onResults={(res, errors, complete) => {
    setResult(res);
    complete();
  }}
/>
Check out the complete code in this CodeSandbox. You can test the application using the data available for download within this sandbox.
Customize Warnings in the Review Step
Beyond data manipulation and other powerful functionalities, you can use the dataHandler to create custom warnings for users when importing data. This will reduce ambiguity and enhance the overall user experience.
The info property lets you add contextual details to data entries. It uses a structured syntax where each column key holds a value representing the data, along with an info array containing objects that provide context for that value. Each object in the info array includes a message string to describe the context and a level string indicating its severity, such as “info”, “warning”, or “error”. This setup helps make data handling more informative and improves the clarity of entries for the end users.
To do this, use the following code snippet:
dataHandler={{
  reviewStep: (modifier, data) => {
    let newData: any[] | undefined;

    if (data !== undefined) {
      const dataLength = data.length;
      newData = [...data];

      for (let i = 0; i < dataLength; i++) {
        const element = data[i];

        if (i === 0) {
          newData[i] = {
            ...element,
            name: {
              value: element.name,
              info: [
                {
                  message: "This is an error.",
                  level: "error",
                },
              ],
            },
            email: {
              value: element.email,
              info: [
                {
                  message: "This is a warning.",
                  level: "warning",
                },
              ],
            },
            amount: {
              value: 1,
              info: [
                {
                  message: "This is an info.",
                  level: "info",
                },
              ],
            },
          };
        }
      }
      return newData;
    }

    return data;
  },
}}
Here's a quick breakdown of the reviewStep function for customizing warning messages:
-
The
infoproperty is utilized to attach detailed context to specific data fields. Each field is represented as an object with both avalueand aninfoarray. Theinfoarray holds objects that include:message: A descriptive string providing context or explanation for the field.level: A severity level that indicates the nature of the message, such as"error","warning", or"info".
-
In this example, the function customizes the first data entry with different levels of warnings:
- For the
namefield, anerrorlevel is assigned, signaling a serious issue. By setting the level as error, you can define whether this issue will prevent this specific row to be imported or not. - The
emailfield includes awarninglevel, indicating something that should be noted but is not critical. - The
amountfield carries aninfolevel, used for general informational purposes.
- For the
-
After adding the contextual warnings, the modified data is stored in
newData, which is returned to reflect these changes. -
By incorporating different levels of context directly into the data entries, this function enhances clarity and usability for end-users, allowing them to quickly identify and address issues, or even understand what specific operation or validation has been done on a specific entry.
This approach allows for detailed, customized messages within the data itself, helping users to better understand and interpret their data during import or review.
Lastly, add this dataHandler hook into the NuvoImporter component:
<NuvoImporter
  licenseKey={"YOUR_LICENSE_KEY_HERE"}
  settings={{
    developerMode: true,
    identifier: "contact_data",
    allowManualInput: true,
    columns: [
      {
        key: "name",
        label: "Name",
        columnType: "string",
        description: "Full name of the individual, including first and last names.",
      },
      {
        key: "email",
        label: "Email",
        columnType: "string",
        description: "Primary email address used for communication with the person.",
      },
      {
        key: "phone",
        label: "Phone",
        columnType: "string",
        description: "Contact phone number for the individual, including country code.",
      },
      {
        key: "date",
        label: "Date",
        columnType: "string",
        description: "The date related to the entry.",
      },
      {
        key: "amount",
        label: "Amount",
        columnType: "int",
        description: "Monetary value associated with the entry.",
      },
    ],
  }}
  dataHandler={{
    reviewStep: (modifier, data) => {
      let newData: any[] | undefined;

      if (data !== undefined) {
        const dataLength = data.length;
        newData = [...data];

        for (let i = 0; i < dataLength; i++) {
          const element = data[i];

          if (i === 0) {
            newData[i] = {
              ...element,
              name: {
                value: element.name,
                info: [
                  {
                    message: "You can customize this message to provide specific feedback about the name entry.",
                    level: "error",
                  },
                ],
              },
              email: {
                value: element.email,
                info: [
                  {
                    message: "You can customize this warning to address any issues with the email format or validity.",
                    level: "warning",
                  },
                ],
              },
              amount: {
                value: 1,
                info: [
                  {
                    message: "You can customize this info message to indicate the context of the amount entered.",
                    level: "info",
                  },
                ],
              },
            };
          }
        }
        return newData;
      }

      return data;
    },
  }}
  onResults={(res, errors, complete) => {
    setResult(res);
    complete();
  }}
/>
Check out the complete code in this CodeSandbox. You can test the application using the data available for download within this sandbox.
Convert Comma-Separated Floats to Dot-Separated Floats
Data may sometimes contain floats with a comma as the decimal separator (e.g., 3,14). To convert these floats into the decimal dot system (e.g., 3.14), you need to replace the commas with dots before further processing the data.
To do this, use the following code snippet:
dataHandler={{
  reviewStep: async (modifier, data) => {
    const dataLength = data.length;
    const newData: any = data;

    for (let i = 0; i < dataLength; i++) {
      const element = data[i];

      if (element.price) {
        const price = element.price;

        if (typeof price === "string") {
          const newPrice = parseFloat(price.replace(",", "."));
          newData[i].price = newPrice;
        } else if (typeof price === "number") {
          const newPrice = parseFloat(price.toFixed(2));
          newData[i].price = newPrice;
        }
      }
    }

    return newData;
  },
}}
Here's a quick breakdown of the reviewStep hunction for converting comma-separated floats
-
The function starts by defining
dataLengthand initializingnewDatato store the processed data entries. It iterates over each entry in thedataarray to inspect and modify relevant fields. -
It specifically looks for entries with a
pricefield. If thepriceexists and is a string, it replaces any commas with dots usingprice.replace(",", ".")and converts the result to a float. This ensures that all prices follow the dot-decimal format. -
If the
priceis already a number, the function rounds it to two decimal places usingtoFixed(2), then converts it back to a float. This standardizes allpricevalues to the correct decimal format, with two decimal places. -
After all entries are converted, the function returns
newData, now containing prices in a consistent dot-separated float format.
This method ensures that any floats with commas as decimal separators are converted to the dot format.
Lastly, add this dataHandler hook into the NuvoImporter component:
<NuvoImporter
  licenseKey={"YOUR_LICENSE_KEY_HERE"}
  settings={{
    developerMode: true,
    identifier: "product_data",
    allowManualInput: true,
    columns: [
      {
        key: "id",
        label: "id",
        columnType: "string",
      },
      {
        key: "full_name",
        label: "Full Name",
        columnType: "string",
      },
      {
        key: "item",
        label: "Item",
        columnType: "string",
      },
      {
        key: "price",
        label: "Price",
        columnType: "float",
      },
    ],
  }}
  dataHandler={{
    reviewStep: async (modifier, data) => {
      const dataLength = data.length;
      const newData: any = data;

      for (let i = 0; i < dataLength; i++) {
        const element = data[i];

        if (element.price) {
          const price = element.price;

          if (typeof price === "string") {
            const newPrice = parseFloat(price.replace(",", "."));
            newData[i].price = newPrice;
          } else if (typeof price === "number") {
            const newPrice = parseFloat(price.toFixed(2));
            newData[i].price = newPrice;
          }
        }
      }

      return newData;
    },
  }}
  onResults={(result: any, errors: any, complete: () => void) => {
    console.log("Errors: ", errors);
    setResult(result);
    complete();
  }}
/>
Check out the complete code in this CodeSandbox. You can test the application using the data available for download within this sandbox.
Backend Data Validation
In some cases, you may need to perform validations on the backend to ensure data integrity and consistency. This can involve making API calls to validate data against external sources or databases. Let's implement this using nuvo's dataHandler. You can define some custom functions to keep the code clean and organized, when defining a more complex dataHandler function.
Here is an example of some encapsulated functions to build the dataHandler that will convert any currencies to US Dollar (USD) by fetching the real time information from an external API:
const fetchAndConvertToUSD = async (apiKey: string, currencies: string[], valueMapping: any[]): Promise<number[]> => {
  const url = `https://openexchangerates.org/api/latest.json?app_id=${apiKey}`;
  console.log("Fetching exchange rates for currencies:", currencies);

  const response = await fetch(url);
  if (!response.ok) {
    console.error(`API request failed with status ${response.status}:`, response.statusText);
    throw new Error(`API request failed with status ${response.status}`);
  }

  const { rates } = await response.json();
  console.log("Received exchange rates:", rates);

  return valueMapping.map(({ currencyCode, value, rowIndex }) => {
    const rate = rates[currencyCode];
    if (!rate) {
      console.error(`Currency ${currencyCode} is not available in the API response`);
      throw new Error(`Currency ${currencyCode} is not available in the API response`);
    }
    const convertedValue = value / rate;
    console.log(`Converted value for row ${rowIndex} (${currencyCode}):`, convertedValue);
    return convertedValue;
  });
};
After defining a function that will perform the main API call, you can define the dataHandler that will call this function:
dataHandler={{
  reviewStep: async (modifier: any, data: any[]): Promise<any[]> => {
    const apiKey = "YOUR_API_KEY_HERE"; // OpenExchangeRates App ID

    console.log("Starting reviewStep with data:", data);

    modifier.addColumn({
      key: "usd_value",
      label: "USD Value",
      columnType: "float",
      validations: [{ validate: "required" }],
    });

    const currencies = new Set<string>();
    const valueMapping: any[] = [];

    data.forEach((row, rowIndex) => {
      const currencyCode = row.currency_code;
      const value = row.value;
      if (currencyCode && value) {
        currencies.add(currencyCode);
        valueMapping.push({ currencyCode, value, rowIndex });
        console.log(`Mapping row ${rowIndex} - Currency: ${currencyCode}, Value: ${value}`);
      }
    });

    const currenciesArray = Array.from(currencies);
    console.log("Unique currencies to be converted:", currenciesArray);

    const convertedValues = await fetchAndConvertToUSD(apiKey, currenciesArray, valueMapping);

    data.forEach((row, rowIndex) => {
      if (convertedValues[rowIndex] !== undefined) {
        row.usd_value = convertedValues[rowIndex];
        console.log(`Row ${rowIndex} updated with USD value:`, row.usd_value);
      }
    });

    console.log("Final data to be returned:", data);
    return data;
  },
}}
Here's a quick breakdown of the reviewStep function for converting currencies to USD:
-
The function begins by adding a new column to the TDM,
usd_value, to store the converted values. This column is defined with afloattype, and a validation to ensure that it’s always populated. -
It then iterates over each row in the
dataarray, collecting any unique currencies that need conversion and mapping the relevant values. For each row, it grabs thecurrency_codeandvalue, which are then added to a set (to ensure uniqueness) and an array for mapping values with corresponding row indices. -
After gathering all unique currencies, the function calls
fetchAndConvertToUSDwith an API key, the list of unique currencies, and the value mappings. This external function makes an API request to fetch the latest exchange rates and calculates the converted values based on real-time data. -
Once the conversions are complete, the function updates each row in the
dataarray by adding the converted USD value under theusd_valuefield. The original row index is used to map the correct USD value back to each row. -
Finally, the function returns the updated
dataarray, now containing a newusd_valuecolumn with currency conversions in USD.
This approach ensures that all currency values are consistently converted to USD, based on the latest available exchange rates from an external API.
Lastly, add this dataHandler hook into the NuvoImporter component, and make sure to include the function fetchAndConvertToUSD to your code as well:
<NuvoImporter
  licenseKey={"YOUR_LICENSE_KEY_HERE"}
  onResults={(res, identifier, complete) => {
    setResult(res);
    complete();
  }}
  settings={{
    developerMode: true,
    identifier: "contact_data",
    allowManualInput: true,
    cleaningAssistant: true,
    columns: [
      {
        key: "value",
        label: "Value",
        description: "A float number.",
        columnType: "float",
        validations: [{ validate: "required" }],
      },
      {
        key: "currency_code",
        label: "Currency Code",
        columnType: "currency_code",
        validations: [{ validate: "required" }],
      },
    ],
  }}
  dataHandler={{
    reviewStep: async (modifier: any, data: any[]): Promise<any[]> => {
      const apiKey = "YOUR_API_KEY_HERE"; // OpenExchangeRates App ID

      console.log("Starting reviewStep with data:", data);

      modifier.addColumn({
        key: "usd_value",
        label: "USD Value",
        columnType: "float",
        validations: [{ validate: "required" }],
      });

      const currencies = new Set<string>();
      const valueMapping: any[] = [];

      data.forEach((row, rowIndex) => {
        const currencyCode = row.currency_code;
        const value = row.value;
        if (currencyCode && value) {
          currencies.add(currencyCode);
          valueMapping.push({ currencyCode, value, rowIndex });
          console.log(`Mapping row ${rowIndex} - Currency: ${currencyCode}, Value: ${value}`);
        }
      });

      const currenciesArray = Array.from(currencies);
      console.log("Unique currencies to be converted:", currenciesArray);

      const convertedValues = await fetchAndConvertToUSD(apiKey, currenciesArray, valueMapping); // Don't forget to define this function in your code

      data.forEach((row, rowIndex) => {
        if (convertedValues[rowIndex] !== undefined) {
          row.usd_value = convertedValues[rowIndex];
          console.log(`Row ${rowIndex} updated with USD value:`, row.usd_value);
        }
      });

      console.log("Final data to be returned:", data);
      return data;
    },
  }}
/>
Check out the complete code in this CodeSandbox. You can test the application using the data available for download within this sandbox.
When you're dealing with complex functions that stretch across several lines of code, it's a good idea to move your dataHandler functions (and any other hooks) into separate files. From there, you can just export them back to your main App.tsx. It'll keep your code cleaner and help you stay organized.
Nesting Information Based on Common Values
Nesting result rows with similar domain values is a common use case when you need to consolidate related data into a single row for better organization and visualization. This approach helps summarizing data and making it easier to analyze it by grouping related entries.
To do this, use the following code snippet:
dataHandler={{
  reviewStep: async (modifier: any, data: any) => {
    const obj: Record<any, any> = {};

    for (let i = 0; i < data.length; i++) {
      const targetColumn = `${data[i]["domain"]}`;
      const targetValue = `${data[i]["product"]}`;

      if (!obj[targetColumn]) {
        obj[targetColumn] = [];
      }
      obj[targetColumn].push(targetValue);

      modifier.removeRow(i);
    }

    for (const [key, value] of Object.entries(obj)) {
      modifier.addRow({
        data: [{ product: value.join(", "), domain: key }],
      });
    }
  },
}}
Here's a quick breakdown of the reviewStep function for nesting rows based on domain values:
-
The function starts by declaring an empty object
objthat will be used to group products by their associated domain. It then iterates through each row in thedataarray. -
For each row, it extracts the
domainandproductvalues. If the domain doesn’t already exist inobj, it creates a new array for that domain. The product value is then added to the corresponding domain array. -
After processing each row, the original row is removed from the data using
modifier.removeRow(i), which helps prepare for adding the new consolidated rows. -
Once all rows are processed, the function loops through each entry in
obj. For each domain, it joins the list of product values into a single string and adds a new row todata. This new row contains the domain and a comma-separated list of products. -
Finally, the function returns a data structure where each domain appears only once, with all associated products grouped together in a single row.
This method ensures that data is organized by domain, making it easier to visually spot related products grouped under the same domain.
Lastly, add this dataHandler hook into the NuvoImporter component:
<NuvoImporter
  licenseKey={"YOUR_LICENSE_KEY_HERE"}
  settings={{
    developerMode: true,
    identifier: "product_data",
    allowManualInput: true,
    columns,
  }}
  dataHandler={{
    reviewStep: async (modifier: any, data: any) => {
      const obj: Record<any, any> = {};

      for (let i = 0; i < data.length; i++) {
        const targetColumn = `${data[i]["domain"]}`;
        const targetValue = `${data[i]["product"]}`;

        if (!obj[targetColumn]) {
          obj[targetColumn] = [];
        }
        obj[targetColumn].push(targetValue);

        modifier.removeRow(i);
      }

      for (const [key, value] of Object.entries(obj)) {
        modifier.addRow({
          data: [{ product: value.join(", "), domain: key }],
        });
      }
    },
  }}
  onResults={(res: any, identifier: any, complete: () => void) => {
    setResult(res);
    complete();
  }}
/>
Check out the complete code in this CodeSandbox. You can test the application using the data available for download within this sandbox.
Remove Empty Cells from Output
Cleaning output by removing empty cells is a common use case when you need to filter out rows or columns with missing or empty values. This can help improve data quality and consistency by removing irrelevant or incomplete information.
Create a new file called CleanOutput.tsx inside the src/components folder and add the following code snippet:
dataHandler={{
  reviewStep: async (_modifier: any, data: any[]) => {
    const filteredData = data.filter((row: { [key: string]: any }) => {
      return !Object.values(row).some((value) => value === "" || value === null || value === undefined);
    });
    return filteredData;
  },
}}
Here's a quick breakdown of the reviewStep function for removing rows with empty cells:
-
The function begins by filtering the
dataarray to create a new array,filteredData, that only includes rows with no empty cells. -
For each row,
Object.values(row)retrieves all cell values, andsome()checks if any of those values are empty. If a row contains any empty cells, it is excluded fromfilteredData. -
Finally, the function returns
filteredData, which contains only complete rows, free from empty cells.
This approach ensures that the resulting data is more consistent and free of irrelevant or incomplete entries.
Lastly, add this dataHandler hook into the NuvoImporter component:
<NuvoImporter
  licenseKey={"YOUR_LICENSE_KEY_HERE"}
  settings={{
    developerMode: true,
    identifier: "cleaned_data",
    allowManualInput: true,
    columns: [
      {
        key: "id",
        label: "ID",
        columnType: "string",
      },
      {
        key: "name",
        label: "Name",
        columnType: "string",
      },
      {
        key: "value",
        label: "Value",
        columnType: "string",
      },
    ],
  }}
  dataHandler={{
    reviewStep: async (_modifier: any, data: any[]) => {
      const filteredData = data.filter((row: { [key: string]: any }) => {
        return !Object.values(row).some((value) => value === "" || value === null || value === undefined);
      });
      return filteredData;
    },
  }}
  onResults={(result: any, errors: any, complete: () => void) => {
    console.log("Errors: ", errors);
    setResult(result);
    complete();
  }}
/>
Check out the complete code in this CodeSandbox. You can test the application using the data available for download within this sandbox.
Next Steps
Great job! You’ve successfully used nuvo’s dataHandler to handle various use cases, including transposing headers, merging multiple sheets, de-nesting list values into rows, gathering file metadata, and other complex data manipulation processes.
The dataHandler is flexible and powerful because it operates on the entire dataset simultaneously, providing complete control. Whether you need to transform a single column or the entire dataset or handle any other edge cases, the dataHandler function empowers you to meet those requirements.
Check out these resources to learn more:
If you need further support or additional clarification, nuvo has a dedicated team to cater to your data transformation needs and support you every step of the way. Send an email to [email protected] to get started.