Columns & Target Data Model
Suppose you already know your preferred output structure and have a CSV, JSON, XLS or XLSX file containing the column names. In that case, you can generate the target data model within the "Setup" tab inside our user platform. For this, follow the instructions of step 3 inside the tab. Furthermore, you can use our no code tool within our user platform (Target Data Model Creator).
Depending on your system requirements, you need to receive data in a specific structure. This structure can be defined within the nuvo importer by specifying the columns array, where each column needs to contain at least a label and a key value. Moreover, you can add a description or example value to provide your users more information for each column. You can add abbreviations and synonyms of the column to the alternativeMatches array to help our mapping algorithm. You could add validation rules by setting up regular expressions, column-cross dependencies, column types (very similar to data types) and/or add a required- as well as an unique-tag. Adding additional column options enables the received data to be transferred into your system with minimal or no further processing.
Here you can see what the "Match columns" step looks like in the nuvo importer, where imported columns (e.g. Organisation) are matched with the columns you defined as target data model inside the columns array (e.g. Company Name).
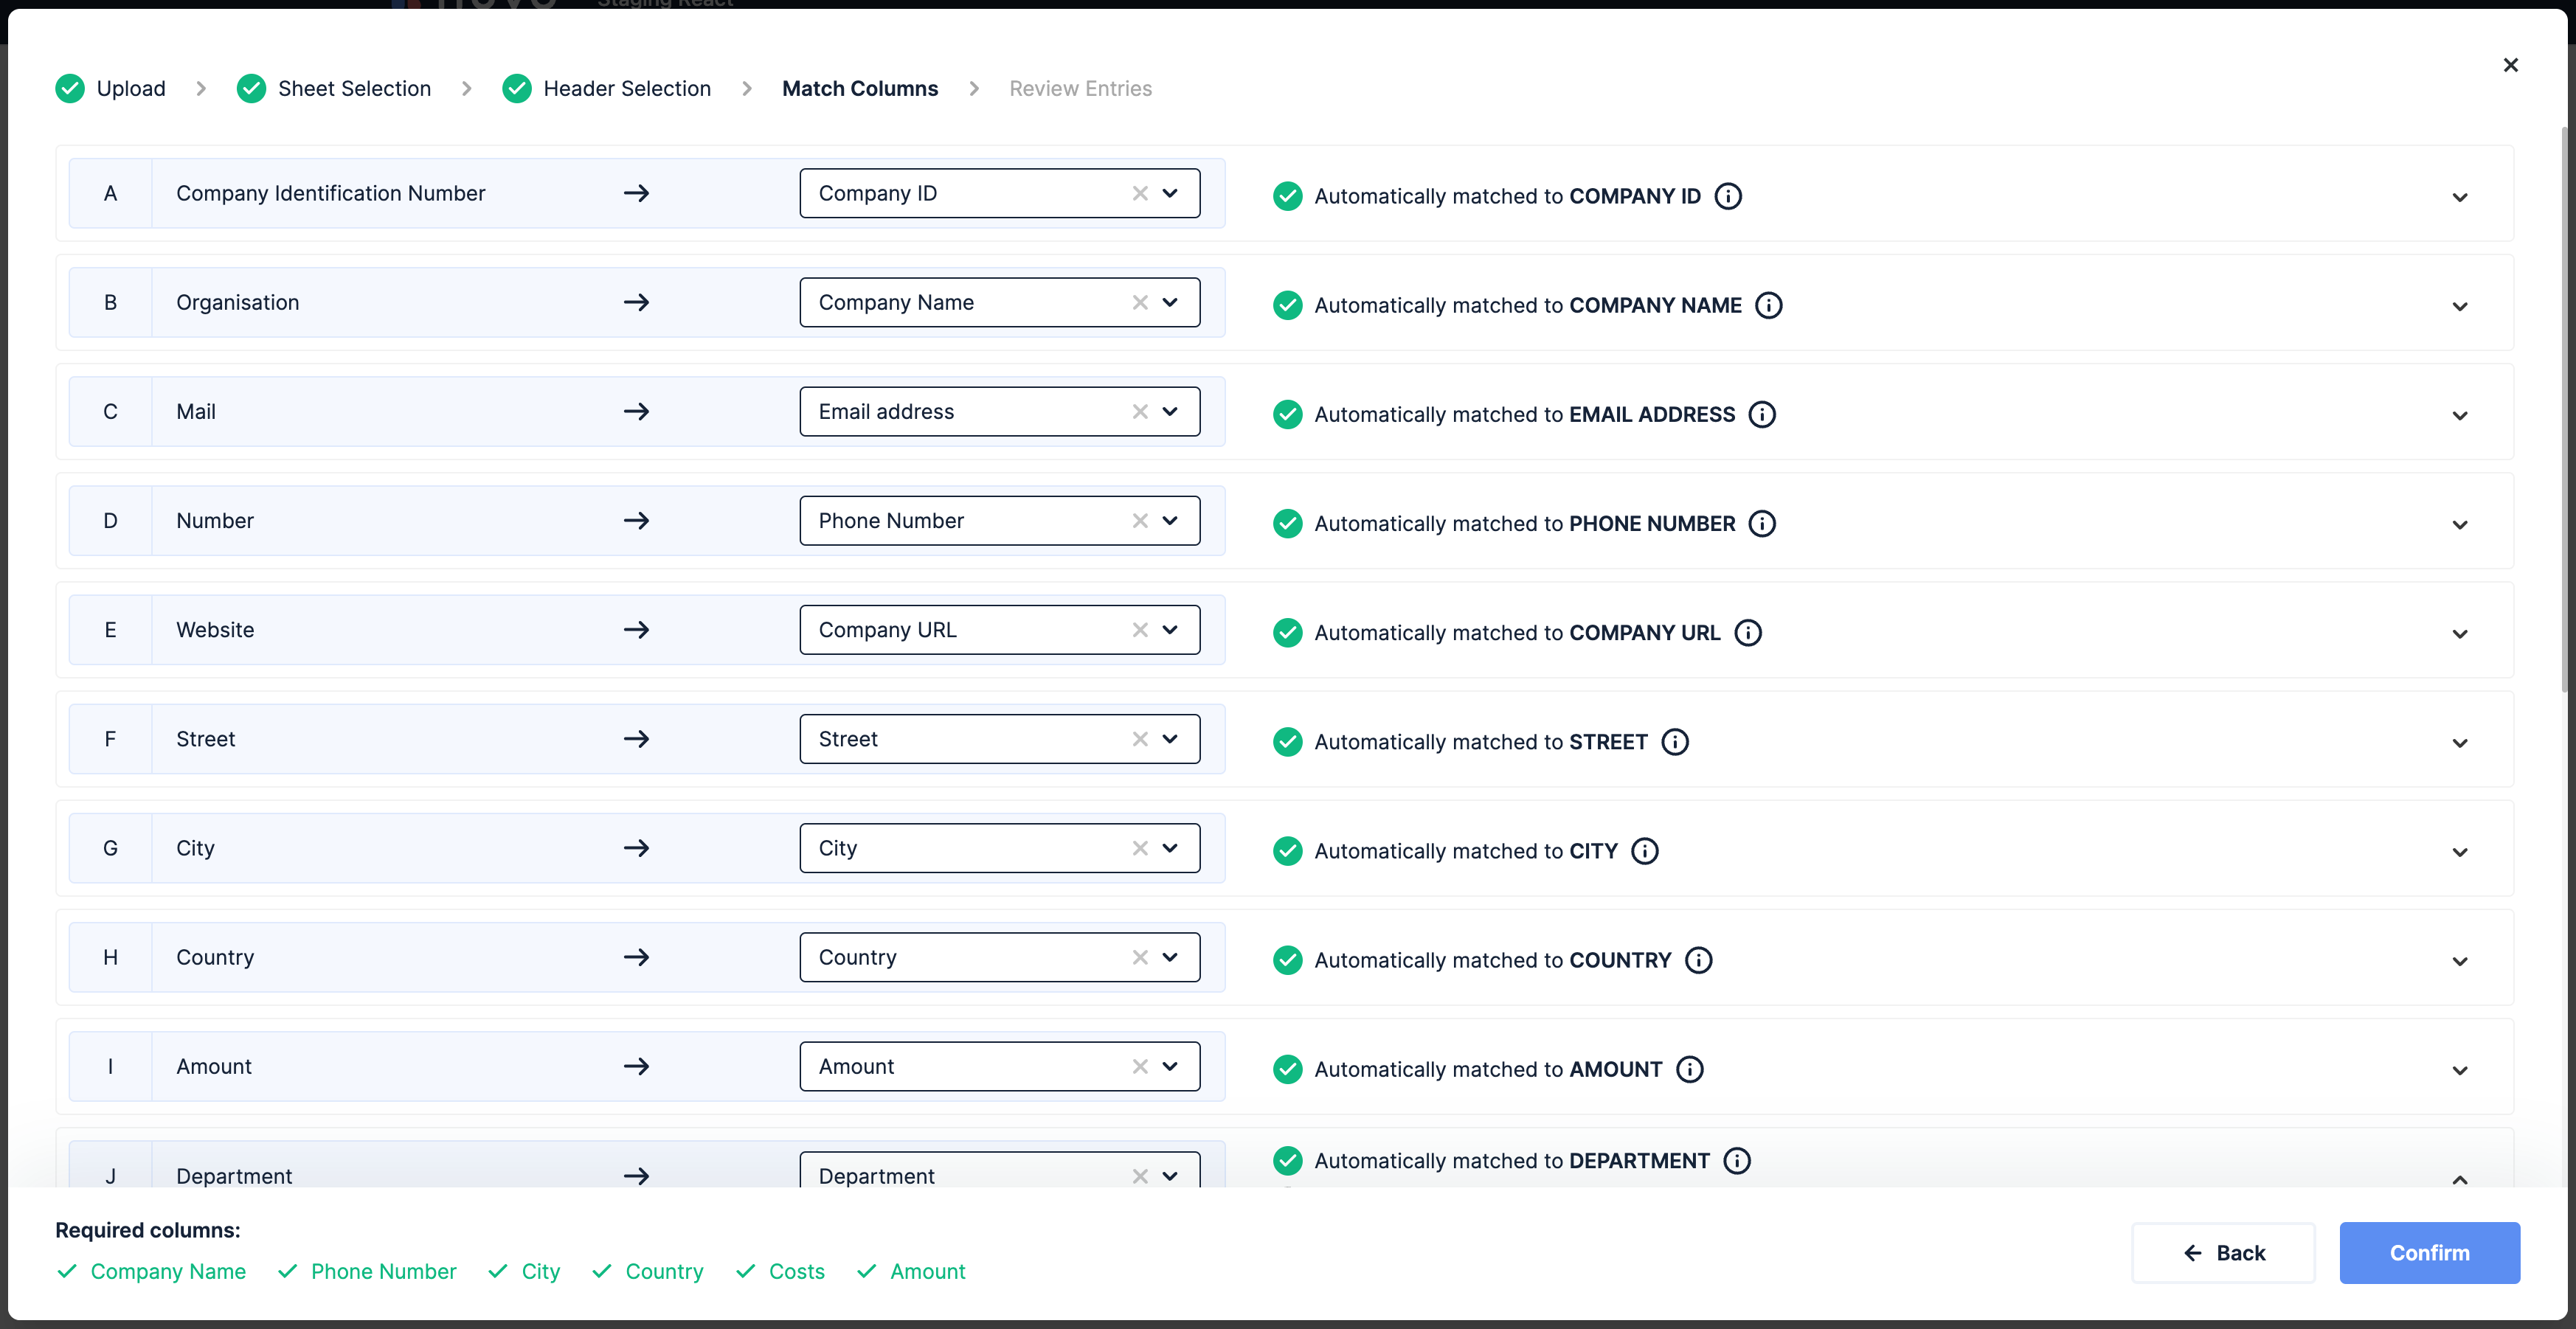
Our mapping algorithm considers the key, the label and the alternativeMatches for estimating the similarity between imported and target columns. For the option mapping, it only takes label and alternativeMatches into consideration.
The label value specifies how a particular column is displayed to the user within the frontend. The key value determines the column name on the technical level. This means that the JSON objects of the result array object contain a property for each defined key inside the target data model.
For example, if you want the following JSON structure with customer_code, customer_name, domain_name, region, deal_size, address, deal_stage and pipeline as properties as the importer's output you would define the target data model as follows:
- Result (JSON)
- Target Data Model
[
  {
    customer_code: "2345678954",
    customer_name: "Nuvo GmbH",
    domain_name: "getnuvo.com",
    address: "Schoeneberger Allee 6",
    region: "Hamburg, Germany",
    deal_size: 10000,
    deal_stage: "Follow Up",
    pipeline: "Pipeline Nr.1",
    deal_ongoing: true,
  },
  {
    customer_code: "2345678955",
    customer_name: "ComDocks Ltd.",
    domain_name: "www.comdocks.com",
    address: "Suedring 28",
    region: "Berlin, Germany",
    deal_size: 25000,
    deal_stage: "Lead",
    pipeline: "Pipeline Nr.2",
    deal_ongoing: false,
  },
  {
    customer_code: "2345678956",
    customer_name: "Nuvo GmbH",
    domain_name: "getnuvo.com",
    address: "Garden Street 12",
    region: "New York, US",
    deal_size: 30000,
    deal_stage: "Follow Up",
    pipeline: "Pipeline Nr.1",
    deal_ongoing: true,
  },
];
columns: [
  {
    label: "Customer Code",
    key: "customer_code",
  },
  {
    label: "Customer Name",
    key: "customer_name",
  },
  {
    label: "Domain Name",
    key: "domain_name",
  },
  {
    label: "Region",
    key: "region",
  },
  {
    label: "Deal Size",
    key: "deal_size",
  },
  {
    label: "Address",
    key: "address",
  },
  {
    label: "Deal Stage",
    key: "deal_stage",
  },
  {
    label: "Pipeline",
    key: "pipeline",
  },
];
After setting up the general structure of your target data model, we recommend you to add more validation rules so that you can ensure that the user-submitted data is not only in the correct schema but also the values are in the preferred format. We suggest adding extra information to each column, especially to the columns which need more explanation, with the description and the example property to increase the user experience and help the user to be able to complete the import process as fast as possible.
Please note that the target data model can also be generated dynamically. This enables you to show each user a different and personalised schema. For example, if you want to generate a user-specific target schema based on the already existing data inside your database of each user. For this, you would fetch data from your backend, transform the fetched data into a (for the nuvo importer) readable JSON structure and insert it into our component before it is initialised. If you have questions regarding this procedure or require a code snippet, contact us via [email protected].
The column class includes several properties with which you can add additional explanation or information for your user, add validations rules as well as data types, and they can also be used to support our mapping algorithm. In the following, all properties of the column class are displayed, including its default value, data type and description.
label (required)
| Type | string |
| Description | label is one of two required properties of a column object. The value is displayed within the frontend to the user, who goes through the importing workflow. This value and the key value is used for the column matching. |
key (required)
| Type | string |
| Description | The value of key defines how your application calls a column. This value is not displayed to your users but is like label used to match this target data model column to the imported columns. |
To prevent unexpected behavior in the review entries step, it is advisable to avoid including . (dots) in the keys (This problem has been solved since version 2.12).
description
| Type | string |
| Description | When defined, an info icon will be displayed right next to the column's name inside the "Match Columns" and "Review Entries" steps. If the user hovers over it, a popover info with the defined string is displayed. This option also accepts HTML content, including elements such as <a>, <b>, <i>, <u>, <p>, and other common HTML tags, allowing for enhanced formatting and interactivity. Therefore, enabling this option allows you to clearly communicate the meaning of the column to the user. |
example
| Type | string |
| Description | The example option allows you to define an example property for each column within the columns array. The value of it is displayed within the table of the data cleaning step. |
This option can only be used when enableExamples is set to true within the settings object.
alternativeMatches
| Type | [ string, ... ] |
| Description | nuvo utilizes machine learning with a logic-based component to provide an intelligent and advanced mapping functionality inside the “Match Columns” step. To be able to force a more precise matching, we offer an additional matching layer with the alternativeMatches property. This should help match the target and imported columns more accurately because every item of the alternativeMatches array is considered for calculating the similarity between imported and target model columns. We recommend adding abbreviations and synonyms here. |
validations
| Type | [ ValidationObject, ... ] |
| Description | With the validations option, you can define the preferred format of your columns and their values. You can also add individualised error messages to show your users what they can do better. Each object of the validations array, can contain up to five key: |
validateerrorMessageregexcolumnscolumnValues
validate
| Type | string |
| Description | With this option, you can use one of our pre-built validation rules such as required, unique, regex and many more. This property offers you the possibility to ensure the highest-possible data quality. |
errorMessage
| Type | string |
| Description | With this option, you can add an fully customized error message to one of the validation rules above. This notification text overwrittes the pre-built error message. |
regex
| Type | string |
| Description | This option contains the regular expression which should be applied to all cells of the column using this validation rule. The value of this property is only required, if validate equals regex within the ValidationObject. The regular expression needs to be JSON-escaped. For more information, visit our regex documentation. |
columns
| Type | [string, ...] |
| required for all column-cross validation rules | |
| Description | This array contains all columns that need to be checked against the column using this validation rule. It is only required when you use validate with required_with, required_without, required_with_all and required_without_all. In the following example, it is displayed how to use required with. The same syntax can also be used with required_without, required_with_all and required_without_all. |
columnsValues
| Type | {columnName: [string, ...], ...} |
| required for all value-based validation rules | |
| Description | This object has a key related to the column name of the column you want to select and the value you want to validate against as the value. It is only required when you use validate with required_with_values, required_without_values, required_with_all_values or required_without_all_values. In the following example, it is displayed how to use required_with_values. This same syntax can also be used with required_without_values, required_with_all_values and required_without_all_values. |
Validation rules
Default validation rules
validate: "unique"- This function makes sure that no duplicates can be entered within a column. Every cell that contains a duplicated value is highlighted as an error. Please note that the first appearance of the repeated value is not marked as an error.
columns: [
  {
    ...
    validations: [{ validate: "unique" }],
    ...
  }
]
validate: "required"- This option ensures that the column is filled and throws an error for the user to notify.
columns: [
  {
    ...
    validations: [{ validate: "required" }],
    ...
  }
]
validate: "regex"- This option enables you to add your preferred regular expression that you want to validate against. Please note that this regular expression must be JSON escaped and a string. For further information, how to use regular expressions within the nuvo importer checkout our regex documentation.
columns: [
  {
    ...
    validations: [
      {
        validate: "regex",
        regex: "^https\\:\\/\\/([A-Za-z0-9]+)\\.([A-Za-z]{1,3})$"
      },
    ]
    ...
  }
]
Column-cross validation rules
validate: "required_with"- In case any cells within the same entry/row of the columns defined in thecolumnsarray are filled, the column cells should not be empty.validate: "required_without"- In case any cells within the same entry/row of the columns defined in thecolumnsarray are left empty the column cells should contain a value.validate: "required_with_all"- In case all cells within the same row of the columns defined in thecolumnsarray are filled the column cells should contain a value.validate: "required_without_all"- In case all cells within the same row of the columns defined in thecolumnsarray are empty the column cells should contain a value.
columns: [
  {
    label: "Region",
    key: "region",
    validations: [
      {
        validate: "required_with",
        columns: ["address"],
      },
    ],
  },
  {
    label: "Address",
    key: "address",
  },
];
Value-based validation rules
validate: "required_with_values"- In case at least one cell within the same row of the columns defined in the columns array is filled and has a particular value - determined within thecolumnValuesproperty - the column cells should contain a value and not be empty.validate: "required_without_values"- In case at least one cells within the same row of the columns defined in the columns array are present and do not have the specific value determined within the `columnValues property the column cells should contain a value.validate: "required_with_all_values"- In case all cells within the same row of the columns defined in the columns array are filled and have the specific value determined within thecolumnValuesproperty the column cells should contain a value and not be empty only.validate: "required_without_all_values"- In case all cells within the same row of the columns defined in the columns array are filled and do not have a particular value determined within thecolumnValuesproperty the column cells should contain a value.
columns: [
  {
    label: "Deal Stage",
    key: "deal_stage",
  },
  {
    label: "Deal Size",
    key: "deal_size",
    validations: [
      {
        validate: "required_with_values",
        columnValues: {
          deal_stage: ["Closed"],
        },
      },
    ],
  },
];
columnType
| Type | "category", "boolean", "int", "float", "string", and more |
| Optional | |
| Description | This option allows you to define the type of the column. You can either choose if the column should contain values which are a category, a boolean, an int, a float, a string or many more. When category or boolean is chosen, the cells of those columns are displayed as dropdowns. The dropdown options for the category column can be provided within the dropdownOptions property. |
You can find a full list of column types with pre-build data validation rules provided by the nuvo importer in the Column Types section.
outputFormat
| Type | string |
| Optional & usable if | columnType: "date" |
| Description | With this key, you can support all your preferred date and timestamp formats such as MM/DD/YYYY, DD.MM.YYYY, YYYY-MM-DD, etc. |
Use the following date variables to create your desired format:
| Type | Syntax | Output |
|---|---|---|
| Month | M | 1, 2, 3, ..., 12 |
| Month | Mo | 1st, 2nd, 3rd, ..., 12th |
| Month | MM | 01, 02, 03, ..., 12 |
| Month | MMM | Jan, Feb, Mar, ..., Dec |
| Month | MMMM | January, February, March, ..., December |
| Day | D | 1, 2, 3, ..., 31 |
| Day | Do | 1st, 2nd, 3rd, ..., 31st |
| Day | DD | 01, 02, 03, ..., 31 |
| Day | DDD | 1, 2, 3, ..., 365 |
| Day | DDDD | 001, 002, ..., 365 |
| Year | Y | 1970, 1971, 1972, ..., +10000 |
| Year | YY | 70, 71, 72, ..., 27 |
| Year | YYYY | 1970, 1971, 1972, ...., 2027 |
| Year | YYYYYY | -001970, -001971, -001972, ..., +001907 |
| Hour | H | 0, 1, 2, ..., 23 |
| Hour | HH | 00, 01, 02, ..., 23 |
| Hour | h | 1, 2, 3, ..., 12 |
| Hour | hh | 01, 02, 03, ..., 12 |
| Hour | k | 1, 2, 3, ..., 24 |
| Hour | kk | 01, 02, 03, ..., 24 |
| Minute | m | 0, 1, 2, ..., 59 |
| Minute | mm | 00, 01, 02, ..., 59 |
| Second | s | 0, 1, 2, ..., 59 |
| Second | ss | 00, 01, 02, ..., 59 |
| Time zone | Z | -07:00, -06:00, -05:00, ..., +07:00 |
| Time zone | ZZ | -0700, -0600, -0500, ..., +0700 |
| Unix timestamp | X | 855599530642 |
| AM/PM | A | AM, PM |
| AM/PM | a | am, pm |
| Quarter | Q | 1, 2, 3, 4 |
| Quarter | Qo | 1st, 2nd, 3rd, 4th |
This table is based on the original table from the open source library Moment.js. You can find the original table and its documentation here. Please note that the table has been adjusted. You can use all variables given in the original table apart from the Day of Week ones.
In the following, you can find an example of how to implement a date column with the format MM/DD/YYYY and a timestamp column with the format "YYYY-MM-DDTHH:mm:ss":
columns: [
  {
    label: "Date",
    key: "date",
    columnType: "date",
    outputFormat: "MM/DD/YYYY",
  },
  {
    label: "Timestamp",
    key: "timestamp",
    columnType: "date",
    outputFormat: "YYYY-MM-DDTHH:mm:ss",
  },
];
numberFormat
| Type | "eu" | "us" |
| Default | "eu" |
| Description | This property is applicable for int, float, currency_eur, currency_usd, and percentage column types. It affects how the numbers will be displayed at the "Review Entries" step. If the value is "eu", then a comma will used as a decimal delimiter, and dots will be used as thousands delimiters. If the value is "us", then a dot will used as a decimal delimiter, and commas will be used as thousands delimiters. |
hidden
| Type | boolean |
| Default | false |
| Description | If this property is set to true, the column can still be mapped but isn't displayed in the "Review Entries" step. It can still be accessed in all callbacks (columnHooks, onEntryInit, onEntryChange, reviewStep and onResults). If you want to make this column unmappable, avoid adding it to the target data model initially. Instead, insert the column after the mapping step using addColumn() within reviewStep. |
disabled
| Type | boolean |
| Default | false |
| Description | If this property is set to true, the column can still be mapped but can't be edited by users inside the "Review Entries" step. It can still be accessed in all callbacks (columnHooks, onEntryInit, onEntryChange, reviewStep and onResults). If you want to make this column unmappable, avoid adding it to the target data model initially. Instead, insert the column after the mapping step using addColumn() within reviewStep. |
Keep in mind that disabled columns can have errors that might block users from completing the import if completeImportAction is set to "block".
dropdownOptions
| Type | [ DropdownOptionsObject, ... ] |
| Required if | columnType: "category" |
| Description | In this array you define the selectable options for the assigned column. Each object of this array is a dropdown option that contains two required and two optional keys. The required keys are label and value and the two optional keys are type & alternativeMatches. This array must be defined when the columnType of the associated column equals category. |
label(required) - This value is displayed to the user who is guided through the importing workflow.value(required) - This key is similar to thekeyprop of acolumnobject. It defines how your application calls a dropdown option and it is not displayed to your users.type- This option allows you to define the type of a dropdown option. You can choose if a dropdown option value is saved as int, float or string inside the result array object.alternativeMatches- ThealternativeMatchesoption allows you to define one or more alternative matches for a dropdown option. ThealternativeMatchesvalues are also matched against the "label". This should help match more dropdown options automatically and increase the matching probability.description- When defined, an info icon will be displayed right next to the option's name inside of the "Match Columns" and "Review Entries" step. If the user hovers over it, a popover info with the defined string is displayed. Additionally, you can render any HTML tags withindescription, allowing for enhanced formatting and interactivity.
If you use TypeScript, you must define type for each dropdown option object.
In the following, you can find an example of how to implement it:
columns: [
  {
    label: "Storage Type",
    key: "storage_type",
    columnType: "category",
    dropdownOptions: [
      {
        label: "dry",
        value: "dry",
        type: "string",
        alternativeMatches: ["arid"],
        description: "This setting indicates a dry state, typically characterized by a lack of moisture.",
      },
      {
        label: "fresh",
        value: "fresh",
        type: "string",
        alternativeMatches: ["unprocessed"],
        description: "This setting indicates a fresh state, often associated with recently harvested or newly prepared items.",
      },
    ],
  },
];
Conditional rendering of dropdowns
The conditional rendering of dropdown options allows you to control which options are displayed in a dropdown based on the value(s) in other columns within the same row. This can be achieved by linking the dropdown options to the relevant columns based on one or multiple conditions.
Operators
The following operators can be utilized to implement a rendering logic for dropdown options:
AND: This operator returns "true" if all of the conditions it is applied to are true.OR: This operator returns "true" if any of the conditions it is applied to are true.GTE(greater than or equal): This operator returns "true" if the value is greater than or equal to the defined value.GT(greater than): This operator returns "true" if the value greater than the defined value.LT(less than): This operator returns "true" if the value is less than the defined value.LTE(less than or equal): This operator returns "true" if the value is less than or equal to the defined value.EQ(equal to): This operator returns "true" if the value is equal to any of the defined value.NEQ(not equal): This operator returns "true" if the value is not equal to any of the defined value.
By combining these operators, you can create complex conditions that determine whether or not a dropdown option should be displayed based on the values in other columns. Once you have set up the conditional rendering rules, the dropdown options will be automatically updated based on the values in the linked columns. This can help streamline your data entry and analysis processes by ensuring that users only see relevant options based on the context of their inputs.
Syntax
To write your own validations for conditional rendering of dropdown options, you can utilize the validations property in your column configuration. The validations property accepts an array of validation objects that define the conditions that must be met for the option to be displayed in the dropdown.
The syntax for a validation object is as follows:
{
  validate: {
    operator: { column: [value] },
    operator: { column: [value] },
    ...
  },
  errorMessage: "Error message to display if validation fails"
}
To define a validation, you need to first specify the operator that you want to use. You can use any of the following operators: AND, OR, GTE, GT, LT, LTE, EQ, NEQ.
After specifying the operator, you need to define the column(key) and the value that the operator will be applied to. You can define multiple operator/column/value pairs within a single validation object to create complex conditions.
Finally, you can define an error message to be displayed to the user if validation fails to provide further feedback.
Here is an example validation object:
{
  validate: {
    "OR": {
      "EQ": { "continent": ["Asia", "Europe"] },
      "GR": { "size": [200] }
    },
    "NEQ": { "country": ["Canada"] }
  },
  errorMessage: "This option is only available for Asian/European countries or for countries with a size greater than 200, except for Canada."
}
In this example, the "OR" operator is used to check if the "continent" column is equal to either "Asia" or "Europe" or the "size" column is greater than 200. The "NEQ" operator is then used to check if the "country" column is not equal to "Canada". If both conditions are true, the dropdown option will be displayed. If either condition fails, the specified error message will be displayed instead.
In case none of the dropdown options meet its validation criteria, the user will be presented with all the dropdown options instead of an empty dropdown.
Best Practices
To avoid duplicate key warnings when working with complex validations, it is recommended to append IDs to the operators by adding a underscore followed by the ID at the end of the operator name. For example, "EQ_id1" can be used for the "EQ" operator.
Here is an example code snippet using this best practice:
{
  validate: {
    "OR": {
      "EQ_id1": { "continent": ["Asia", "Europe"] },
      "EQ_id2": { "size": [200] }
    },
  },
  errorMessage: "This option is only available for Asian or European countries or when the country size is greater than 200."
}
Example
This code example showcases how the dropdown options in the Storage Type column are determined by validations that are based on the value of the Storage Temperature column.
The available options in the Storage Type dropdown menu are dependent on the Storage Temperature value. If the Storage Temperature is below 15 degrees Celsius, the user will be able to select either the "Frozen" or the "Unknown" option from the dropdown. If the Storage Temperature is 15 degrees Celsius or higher, the user will see the "Dry" and the "Unknown" option in the dropdown menu.
columns: [
  {
    label: "Storage Temperature",
    key: "temperature",
    columnType: "float",
    validations: [{ validate: "required" }],
  },
  {
    label: "Storage Type",
    key: "storage_type",
    columnType: "category",
    dropdownOptions: [
      {
        label: "dry",
        value: "dry",
        type: "string",
        validations: [
          {
            validate: {
              GTE: { temperature: [15] },
            },
            errorMessage: "This option is only available when storage temperature is greater or equal than 15 degree celsius.",
          },
        ],
      },
      {
        label: "frozen",
        value: "frozen",
        type: "string",
        validations: [
          {
            validate: {
              LT: { temperature: [15] },
            },
            errorMessage: "This option is only available when storage temperature is lower than 15 degree celsius.",
          },
        ],
      },
      {
        label: "Unknown",
        value: "unknown",
        type: "string",
      },
    ],
  },
];
optionMappingConfiguration
| Type | object |
| Description | Configures how the unique input values are matched to the options of the target data model column. You can define where the mapping runs, which matching layers to apply, and the confidence threshold for accepting matches. |
This setting is available in version 3.x and above. Please follow our First Steps guide to set up the importer. If you previously used version 2.x, make sure to switch to our new npm packages: @getnuvo/importer-react, @getnuvo/importer-angular, @getnuvo/importer-vanilla-js, or @getnuvo/importer-vue.
processingMode
| Type | "browser" or "node" |
| Default | "browser" |
| Description | Choose where the option mapping should be executed. You can specify whether it runs inside the browser ("browser") or on the server ("node"). |
"browser"- If selected, the option mapping for this column is executed in the browser. The smart and historic layers cannot be applied in this mode."node"- If selected, the option mapping for this column is executed on the server.
layers
| Type | [string, ...] |
| Default | ["exact", "fuzzy"] |
| Description | Select which mapping layers are used. When multiple methods are selected, they are applied in this order: exact matches first, then historical patterns, followed by AI-powered matching, and finally, fuzzy matching. |
"exact"- Finds exact matches only (ignoring special characters and case)."historic"- Considers mappings from previous imports. Cannot be applied whenprocessingModeequals"browser"."smart"- Uses our nuvo AI for mapping. Cannot be applied whenprocessingModeequals"browser"."fuzzy"- Identifies partial text similarities.
threshold
| Type | number |
| Default | 0.6 |
| Description | This threshold (a value between 0 and 1) sets the minimum confidence required for a match to be considered valid. A lower value increases match flexibility, allowing more potential matches, while a higher value enforces stricter matching. The default is 0.6 (60%). |
isMultiSelect
| Type | boolean |
| Optional & usable if | columnType: "category" or "country_code_alpha_2" or "country_code_alpha_3" or "currency_code" |
| Description | If this property is set to true, the user can select one or multiple dropdown options for each cell of the assigned column. |
allowCustomOptions
| Type | boolean |
| Default | false |
| Description | This property enables the user to add custom dropdown options to a category column (columnTypes equals category). If this option is set to true, the user can add custom options to a category column within the category dropdown menu and map the unique values of an imported column to them. |
Note that the newly added options will not be permanently added to the dropdownOptions array of the target column. If you want custom options to be permanently added to the specific column, you must dynamically generate the dropdownOptions array, including the new options, before initializing our component. Please contact us via [email protected] if you have any questions regarding this topic.
optionMappingMode (deprecated)
| Type | "exact" | "smart" |
| Default | "smart" |
| Description | With this option, you can choose either to consider only exact matches (ignoring case and special characters) or to use our intelligent mapping algorithm when mapping options. "exact" ensures that only syntactically identical matches are recommended, while "smart" employs nuvo's AI mapping algorithm to identify matches that are either syntactic or semantic. |
optionMappingMode has been deprecated. For version 3.0 and higher, please use layers, threshold, and processingMode inside the optionMappingConfiguration to configure the details of how the option mapping should be executed.